NEW How To Create A Dynamic Brand Directory Page With Metaobjects & Fields
With Metaobjects & Fields

“Branding is what people say about you when you are not in the room” ~ Jeff Bezos (CEO of Amazon)
In this article we will find out the what, how and why of branding, in all aspects. Branding is a very large subject, but hopefully with this information you will be able to create a solid branding look and feel for your store.
What to expect in this article:
Why do you need a Brand Strategy?
Simply put, your brand strategy will help define how your customers see your business and product. It’s figuring out your positioning or “winning-difference”. Most importantly it’s what helps you stand out from the competition and avoiding having to compete on price.
Building a brand strategy for your ecommerce store is also powerful marketing, customer retention, and loyalty technique and is necessary for any new or established ecommerce business.
It’s important to determine your brand strategy and positioning before branching out into any other aspects of your business. Otherwise, you might find yourself working backward to try and get your business to resonate with customers.
Make your message very clear and concise and understanding to your customers as soon as they land in your store.
In this article, we are only going to deal with the basics of branding and choosing your theme.
I will, however, give you a few steps to create your basic branding so that you can successfully launch your store. This will help you establish how you want your store to look and feel like.
My brand has changed since I started and is going to change again in the future. My point is, don’t fret over deciding what your brand is going to look like now. Make a decision, and start your store. This is more important!
IDEA: Your brand can change anytime, and think of it as a relaunch when you rebrand!
The basics of your brand is the tone of your colors, the look of your store, the fonts you would like to use, and the images you choose.
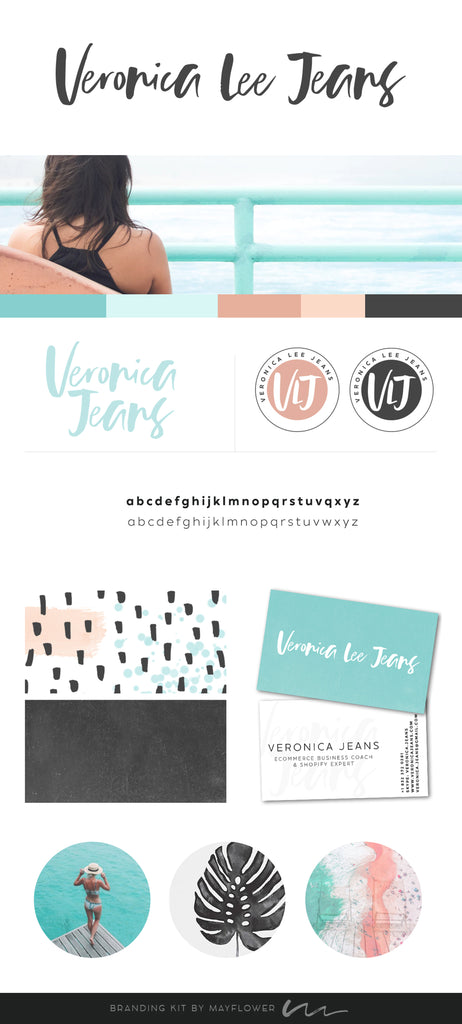
It is a great idea to create a brand storyboard to start with.
Here two examples of a designed brand storyboard:
The image below I bought on Etsy and used for about a year or so.
Find 5 - 10 brands that you like and make a list for parts of their branding you like.
Things you want to start to take note of as you do your research:
List the characteristics of your favorite brands.
List out 10-20 words that come to mind when you think of these brands.
I recommend using a combination of nouns and adjectives that pop in your head within the first few seconds of looking at their websites, watching their videos or viewing their social profiles.
Decide how YOU want your brand to be perceived.
Before you start creating a logo, choosing your fonts and colors, or setting up your online presence, you need to get clear about how you want people to perceive your brand.
We’ve already accelerated this process by describing the brands that you want to emulate. Your job right now is to take the best characteristics of your favorite brands and start to mold them into your own brand.
This exercise will benefit you when you start writing your story and descriptions for your products.
Visualize your brand.
Now you are able to envision what your brand is going to look like. Once you have completed this exercise, it will make it easier to describe your vision to a designer.
Only you can make this happen. Most of the time, if you hand the decision of what your brand is going to look like to somebody else, you will be disappointed because it is never what you have envisioned in your head.
Now you can see the colors, the font and also know the sound of your store you want to present to the world.
Here are a few things you need to prepare and have ready to customize your theme.
TIP: Do not use any fancy font for your body text. All of your fonts have to be readable in any browser. Make sure you test your fonts out on a page to see what it will look like. It is easier to keep to the normal basic fonts.
If you don’t know anything about branding and you need help, there are several ways to get something done cheaply but good value for money.
The cheap route would be Etsy. There are quite a few branding companies that will create a quick branding package. Included would be your logo (or a couple of options), your colors and also fonts.
I have worked with some great agencies that do awesome branding packages that won’t break the bank, but you will be able to work with them. There will be more opportunities to make changes to really get what you want.
Now that you have an idea what you want your business to look, feel and sound like, you can start putting your ideas together.
Here is an excellent article about colors for your store:
Well, the color choices on your website, and how dated they feel, has a bigger impact on visitors than you might realize.
In fact, research shows that people judge products within 90 seconds of exposure — and 90% of that judgment is based on color alone. Choosing the right colors can enhance readability by 40%, increase comprehension by 73%, and improve learning by 78%.
Colors are one of the most important elements that add credibility to your website. According to HubSpot, 46% of people rank the design of a website the number one factor in determining the credibility of a company.
Quicksprout says:“The University of Toronto conducted an interesting study on colors and how they are perceived by individuals. The results were very intriguing. They determined that most people prefer combinations of simple colors. In most cases, just two or three colors were perceived as appealing. That’s why sticking to a color palette is so important to the success of your site, and ultimately your business”
Four (4) different colors on your color palette is probably the max for your website. If you are using more colors, use the shades of the same colors as the main 3 or 4 colors. Colors should be used as accents and also to emphasize.
Have fun choosing.
Designing the most effective Brand Logo:
Normally I experiment with different sizes and see what size logo looks best visually
Wikipedia says:
“A favicon, also known as a shortcut icon, website icon, tab icon, URL icon, or bookmark icon, is a file containing one or more small icons, associated with a particular website or web page.”
Where do you see the favicon?
The tiny little logo on the browser tab when you open the website and you can see it on the tab of the browser.
It just personalizes your website/store and it really looks professional and is tactical. So if somebody bookmark’s your website, your mini logo will be bookmarked as well.
The size of the image has to be 32 x 32 pixels. Create a PNG (which means that the background is transparent). Don’t add too much information in this image.
Strip your logo to the essential details and test it out on your store. Check it out on other websites and see what it looks like.
Add the image into your customization settings. The favicon image will be automatically added to the browser tab.
TIP: Don’t go too fancy or drastically artistic with your fonts. There are several reasons why. The main issue is readability. Make it as easy on the eyes as possible. Remember, when you read the (a fancy) font on a mobile, it will be really difficult to read.
Fonts to avoid: Cursive, curls, or New Roman (this looks good on paper but not on the web). Test fonts on friends and family :)
Use the hierarchy of the size of your fonts in your editor - H1, H2, H3, H4...etc. You can use several headings, just make sure to use them in the right order.
For example:
Customers cannot feel, touch, or smell your products!
So you have to present the best photos to fire their imagination and make them want to buy your products.
It’s all about your images which should be bright and beautiful.
Here are some small facts:
60% of people engage with photos.
90% of the information is transmitted to our brain visually.
93% of consumers consider images essential in purchasing decisions.
You don’t have to have them professionally done unless you are selling food or fashion shots. I would then suggest you have your photos done professionally if you are selling food or fashion because if you take your own photos of food it never looks as good as professional photos and you will be grateful you actually made the effort to get a professional photographer.
Examples:
Professional photos
Products Photos
What is wrong with this image:
Remember people can’t smell or taste your products so you should try to make your images look unbelievably tasty and ready to eat. Make them feel hungry!
Here are some tips to create your products photos:
TIP: “Do not use images that are a small size and enlarge them. Especially if you copy images from the website or if your phone does not take large images (Settings on your phone you need to change when taking decent photos). The image will be pixelated (very grainy) which means the image will not be clear when you view it on your computer. If your images are grainy, it definitely doesn’t make a good impression!”
Try to keep the look of your store consistent. If you are showing images on a white or colored background, make sure all your first images are the same.
If you want lifestyle images to be your first look, keep that style of an image on the first image shown.
Suggestions for images sizes:
Shopify:
Product images - 1000x1000 pixels. Or if you have long (horizontal) images, ‘width’ x 1000 px.
Why do I mention 1000 pixels? It is an Amazon requirement so it is worth creating your images only once if you want to add your images to Amazon.
Hero shots or sliders or panoramic photos at the top of your pages:
Size: 1600 x 600
This is a nice size if you want to fill up the whole browser window.
Collection images:
Size: 480x480 pixels
Your images will resize to the collections you have in one row.
If you want your collection images to show as banners, they will resize accordingly. Just be aware of this and make sure your images are presented the way you want them to.
Amazon:
The main image size to be 1000x1000 pixels and white background.
You can also add lifestyle photos as extra images.
Add some videos to really make a good impression with your customers.
The height of the images can vary to match the visual look you want to achieve in your store.
For example:
If you want tall images.
Or if you want square images.
Or rectangle images.
Just keep every image the same size throughout your store.
Here is what not to do with your images:
Make a decision at the beginning of creating your website. Decide the size of your images, the look of your images, and the style of your images. Create a custom size in Canva.com or photo software, and stay consistent.
TIP: Keep your image resolution of your low. You want to decrease your website download speed to a minimum and keeping the resolution low for your images will help.
FACT: 76% or more buyers shop on their mobile phone before they pop onto your website to buy items from a desktop or iPad.
None of this should come as a surprise. Next time you go out in public, take a moment to look around and observe your fellow humans. Whether you’re on the subway, at a coffee shop, or just walking down the street, it won’t take long to notice a pattern—practically everyone is on their mobile phones.
Think about this scenario -
People are at the office working when actually searching for products to buy. Imagine them being on their lunch break cruising around the web to look for stuff to break the monotony. They are checking stuff out on their mobile phones. Then when they are ready they hop onto the desktop to buy!
It is always the best to have your own photos for product, banner or collection images.
Stock photos look like stock photos. And guaranteed if you use free stock photos, somebody else has them as well.
If you want your brand to stand out, make sure your photos are amazing and personal. I know if you are selling other vendors and brands, that is not always possible. But try and personalize your store as much as you can with your own images.
TIP: Don’t copy images online because the photos/images could be copyrighted. If you snag a copyrighted image you can get sued for damages.
FACT: Happened to one of my customers who has a personalized puzzle store - she was displaying a photographer’s work as one of her photo puzzles. It cost her $5000 just for infringing on one photo!
Photos/ Graphics Free and beautiful stock photos to use inside your store!
If you want to use free stock photos - here are the really good websites that actually offer free stock photos. Make sure you can use the images for commercial use.
Websites to check for free images:
Unsplash
Startup Stock Photos
New Old Stock
Wikimedia Commons
Super Famous
Little Visuals
Death to the Stock Photo
Pexels
Pixabay
Compressor.io
Shopify Burst
There’s a trick to get free Google images
Go to ‘Settings’ and click on ‘Advanced Search’
Decide what type of images you are looking for (where you see the ‘free images’ text) and choose ‘usage rights’ dropdown. Use ‘free to use, share or modify, even commercially’. Search for your free photos. Always make sure to check if they have a copyright on the photos before using the images.
Why are videos so important?
But the bottom line is since the film industry started, people are fascinated about moving pictures. If an image won’t stop them to look, a video will definitely pique their interests.
Videos these days are so easy to record. If you have a good mobile phone, you are already able to shoot your own videos.
Did you know?
“Video can grow your business 49 percent faster, according to Hubspot and you will have 10X higher reach if you upload your native video to Facebook instead of a YouTube link. And it creates a deeper relationship with your customers and viewers”.
Here are 7 ways to use video in your Shopify store:
Once you have some videos, here are some steps of where to add your videos.
Create an on Vimeo or Wistia.
Upload your video and personalize your video tools under ‘Embed’ on Vimeo/Wisteria. Copy the embed code from Vimeo and add the embed code to your product page or wherever you need the video in your Shopify store.
Why Vimeo and not YouTube?
YouTube is great to spread the news of your business and it is important to have a YouTube channel. But Vimeo is ad-free and you can control what customers see while they are watching the video. You can control even after they finished watching the video.
How and where to repurpose your videos.
If you create a Thank You video, add it to the ‘Order Notification’ in Shopify, and also add the video to your Thank You page through an App - CheckOut Video.
You can obviously have a video created professionally but it will obviously cost more. This is a cheaper way to create more awareness of your store and your products.
I will cover more about videos and great ideas in my upcoming book - ‘Optimize Your Shopify Store’.
Watch on my Facebook Business page for an announcement.
Canva.com is an excellent image creator and free. You can also upgrade to get more capabilities but the free version is great.
Pixelz.com will enhance your photo overnight. I have been using them for years. The cost of editing your photos is amazingly low.
Tools to create your videos with either your videos or you can use images to create a video.
If you want video tools with more control:
Mac computer - iMovie, Screenflow
PC computer - Camtasia, etc.
RESOURCES
Here is a great article about free software and freemium software:
https://www.tomsguide.com/us/best-free-video-editing-software,review-5301.html
More Tools on my website:
https://veronicajeans.com/pages/jumpstart-method-tools
Here is a great article to read:
https://pixelunion.net/blogs/state-of-the-union/mobile-ecommerce-stats
What is next?
In the next article, we will create your collections in Shopify.
