AI
How to Set Up Shopify Collaborator Permissions for AI-Assisted Store Management
Most store owners accept a Shopify collaboration request and assume the setup is done. It is not. This guide shows yo...

You need to understand your financial business requirements in your Shopify store and how your money moves.
This is one of the most important sections in your store which are your financials. This article covers how you get paid, how much your merchant interest (%) rate is, and what payment options are available to your customers while they are shopping
What to expect in this article:
PAYMENTS SETTINGS
PAYMENT PROVIDERSEach of the main sections under ‘Payments’ covers your financial part of your business.

What Information Do You Need Before You Add A Payment Provider?
Collect this information before you start:
If you are a DBA - Doing Business As (DBA) Definition: The operating name of a company, as opposed to the legal name of the company, you might still need an EIN.
See below what you need when you fill out the Shopify Payment form.
You can implement the following payment providers:
Shopify says:
“Understanding the payment process is an important step toward getting paid by your customers. When a customer checks out, they can choose to pay for their order using any of the methods that you've enabled in the Payment providers area of your Shopify admin. You can enable a variety of payment methods using Shopify.
There are a few different things to consider when you're choosing which payment methods to offer. If you want to let your customers pay using a credit card, then you can use Shopify Payments or a third-party provider.
There are also several ways for customers to pay online without using a credit card, like PayPal, Amazon Pay, and Apple Pay. You might also want to accept alternative methods of payment like cryptocurrency.
Accelerated checkouts like Shopify Pay, store shipping, and payment information for returning customers to help them check out faster. Some payment providers, like Paypal, Amazon Pay, Apple Pay, and Google Pay, also offer accelerated checkout buttons that can be enabled on your Shopify checkout.
When choosing a payment provider, consider the countries where your business is located and where your customers live. Shopify's list of payment gateways by country can help you find out which payment gateway is available in your country and what currency they support.”
Step 1. Business Details
See the images below for a step by step representation of what to choose for your business. This information you will get from your CPA or your business lawyer. If you set this up yourself, it is all in your paperwork.
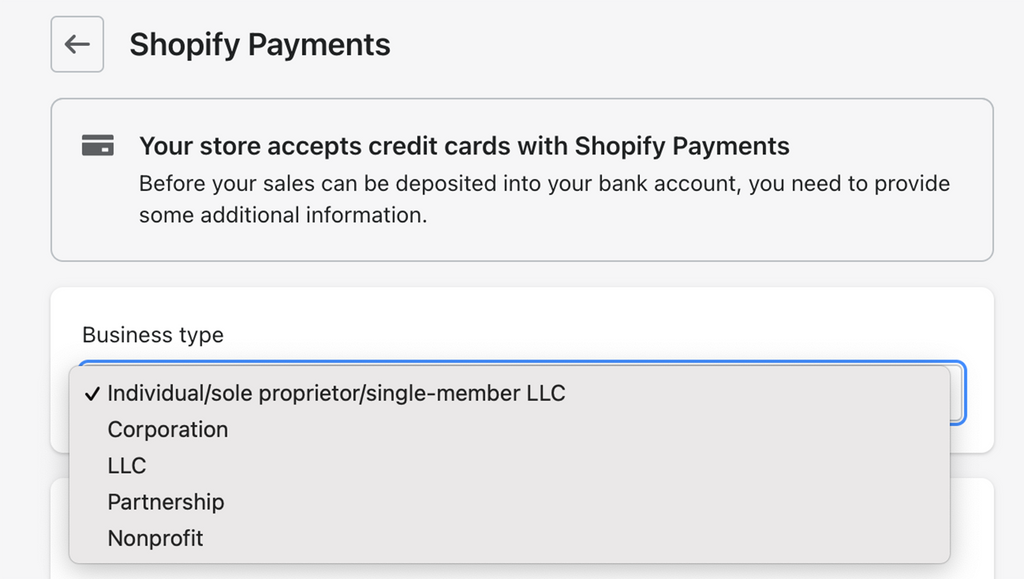
4 Options for Business Entity
1. If you are a sole proprietor/individual/single-member LLC, you would probably only need your Social Security Number for your registration. This information is the same as when you created a business bank account with your bank.
TIP: I would suggest not using a personal bank account for business. It is a good practice to separate your personal and your business banking right from the start. I will not go into detail here but do consult your CPA or your banker.

2. If you are registered as a corporation, you will need your EIN number (federal tax number). Add you legal business name or your DBA (doing business as) and this name will be reflected in your invoices to your customers.
I always think it is best not to confuse your customer with too many business/domain names, so if your corporation name is different to your store name, it is a good idea to create a DBA in the same name as the store name.
3. If you are registered as a partnership (LLC), you will need your EIN number (federal tax number). Add you legal business name or your DBA (doing business as) and this name will be reflected in your invoices to your customers.
I always think it is best not to confuse your customer with too many business/domain names, so if your corporation name is different to your store name, it is a good idea to create a DBA in the same name as the store name.
4. Non-profit organizations are a little bit more involved, so a good idea is to make sure it is all legally registered. Non-profits also need an EIN number for setup.
Step 2. Personal Details
It is important to fill out the personal information of the person who is associated with your bank account and they should be a business owner or significant shareholder.

If you do not add the correct information, this can create a frustrating point of proving you are the owner of this business/store.
Step 3. Product Details
Fill out the type of products you are going to sell. Add the category of products that suits your store.
For instance: fashion, shoes, kid’s clothes, boutique, skincare, industrial fittings, etc.

You have to add your product details, otherwise this section will not be able to save.
Step 4. Customer Billing Statement
Edit the way your store name and phone number appear on your customers’ bank statements.
Step 5. Banking Information
The banking information is the bank account you want your money to be deposited into when your customer pays for their products
Enjoy hassle-free bill payments with Shopify balance
I advise my clients to check this because you don’t have little bits and pieces appearing in your bank account.
TIP: Talk to your accountant.
TIP: Complete Your Account Setup.
Make sure the information is correct the first time. It is not easy to change some of your financial information after the fact. Your business details, personal details, and product description is not available for changes.
PAYMENT INFORMATION
Transaction fees
If you're using Shopify Payments (your payment provider is ‘Shopify Payments’, which is not to be confused with Shopify), then transaction fees don't apply for orders.
Transaction fees also don't apply for manual payment methods. Manual payment methods include cash on delivery (COD), bank deposits, checks, test orders, and draft orders marked as paid or pending. Transaction fees don't apply for POS orders.
If you don't use Shopify Payments or you use the manual payment method, then transaction fees apply for orders in addition to the processing fee charged by your payment provider.
The way that your account is billed depends on your store's transaction volume, any recurring App* charges, and the payment provider you use.
Step 6. Payment Options
Accepted Payment options with Shopify are the following:

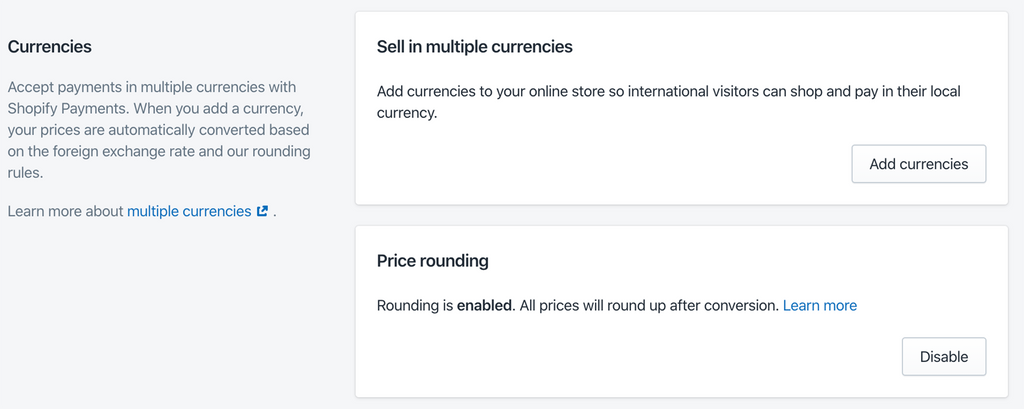
Step 7. Currencies
You can accept payment in different currencies. Your payments are automatically converted based on the foreign exchange rate and our rounding rules.
Sell in multiple currencies
Add currencies to your online store so international visitors can shop and pay in their local currency.
Shopify says:
“Selling in multiple currencies lets your customers pay for their orders using their currency. This feature is a good option when your business is in one of the following situations:
You have one online store that has international traffic and you want to increase your conversions from your international customers.
You want to offer regional stores. For example, you have a store in one region and you'd like to sell to customers who live in a similar region, but use a different currency. Australia and New Zealand are similar in that they are geographically close and share the same seasons. You could use selling in multiple currencies to sell in Australia and offer a regional experience for your New Zealand customers.
You have a strong international presence with stores in different countries and regions. You have one international store that uses selling in multiple currencies to convert customers where you don't have a specific presence yet.”
Price Rounding
This is a great idea if you are selling internationally. Especially if you expect to give refunds. The exchange rate is extremely volatile and can be very detrimental to your bottom line.
Shopify says:
“During the conversion process, your prices are rounded to make them more consistent. Your converted prices change based on the currency exchange market, but the rounding rules help keep your prices stable. You can turn rounding rules off by clicking Disable.
Your prices are converted by multiplying the store price by the currency conversion rate, adding the conversion fee, and then applying the rounding rules for that currency. Your converted prices include your currency conversion costs. For example, when a $10.00 USD product is converted to Euros, the converted price of €8.90 includes the currency conversion rate and conversion fee:
(Product price x currency conversion rate) + currency conversion fee
($10.00 USD x 0.867519) + 1.5% = €8.81
Shopify applies a rounding rule that brings the total up to €8.90.”
Step 8. Payout Details
This is the bank account that you will receive any money from the sale of your products in your store.
PAYOUT OPTIONS
Payout statement descriptor
If you have several stores, this is a great way to identify the payments from your store in your bank account.
Payout schedule
Depending on your preferences, you can schedule payouts from Shopify to your bank account.
Step 9. Fraud Prevention
Fraud Protect
Shopify has great fraud protection in place. If you wanted to add another layer of fraud protection, this is the way to go.
You’ll pay a 1.2% fee for protected orders processed by Shopify Payments.

Automatically decline charges
I suggest enabling both these boxes. This is the inherent fraud protection in Shopify. My experience at least has this protection.

Shopify says:
“Address Verification System (AVS) - AVS compares the numeric part of the customer’s billing address and zip code or postal code to the information on file with the credit card issuer. This helps reduce a significant amount of fraud because unauthorized users often don't have the correct billing address.
Card Verification Value (CVV) - The CVV is a 3-digit or 4-digit number on the back of the customer’s credit card. Credit card companies prohibit the storage of the CVV code, so asking for the CVV is a way of ensuring that a customer has the card physically in their possession. Credit card information stolen from a merchant database is also less useable because it shouldn't contain CVV information.”
Step 10. Customer billing statement
Shopify will add your company information automatically but you can change this to whatever you want.
Step 11. Test Mode
Before you start your store, create a payment in Test Mode. The charge will not get processed but you can see and practice how to process your orders, and make sure your checkout works the way you want it to.
Under Shopify Payments, you will see this option. Remember to uncheck once you have done your first test payment.

SIMULATE TRANSACTIONS
Simulate successful transactions
Simulating some transactions gives you the opportunity to test your system and get used to the order processing before you go live with your store.
I have added the information from the Shopify support page:
“To simulate a successful transaction, use the following information when you are asked for credit card details at checkout:”

Simulate failed transactions
Testing a failed transaction is as important as a successful transaction.
Shopify says:
“If you want to see the credit card error messages that might be displayed to a customer during checkout, then you can use these test credit card numbers to simulate different failed transactions:
* Use credit card number 4000000000000002 to generate a card declined message.
* Use credit card number 4242424242424241 to generate an incorrect number message.
* Use credit card number 4000000000000259 to simulate a disputed transaction.
* Use an invalid expiry month, for example, 13, to generate an invalid expiry month message.
* Use an expiry year in the past to generate an invalid expiry year message.
* Use a two-digit security code number to generate an invalid security code message.”
When you go ‘Live’, remember to disable the Test Mode.
RESOURCES:
What is next?
How To Set Up PayPal Express & Amazon Pay In Your Shopify Store #4