You can ship your products from different locations directly in your Shopify store. And you can create different shipping profiles or options for a selection of products.
Your choices of shipping services are either Shopify shipping services (USPS, UPS, DHL Express) or your own shipping accounts (FedEx, UPS, USPS, DHL).
What to expect in this article:
- LOCATIONS
- SHIPPING & DELIVERY
- Different Types of Shipping Rates
- Rates at Checkout
- General Shipping
- Set Up Your Shipping
- Set Up Shipping Rates
- Shipping from
- Setting Up Your Shipping Profiles
- Different Types of Shipping Rates
- Setting Up Your Domestic and International Shipping Zones
- Custom Shipping Rates For Products
- Shipping from Different Locations
- Packages
- Shipping Labels
- Packing Slips
- Accounts & Integrations
- Carrier Accounts and Fulfillment Services
- Carrier accounts
- Custom Order Fulfillment

1. Locations
**Where to find this in Shopify? Settings > Locations
4 Ways to Use Your Location Settings
- This comes in very handy if you dropship from one or different vendors.
- Under your Product settings, you will be able to allocate the different shipping locations for each vendor you use.
- If you have a manufacturer or your inventory is in a different location, you can allocate different shipping addresses.
- And when you are shipping your products from your own location, and you also have different vendors shipping products, you can create various locations to include all sites.
The maximum number of locations that you can have depending on your plan:
- Shopify Lite - 3
- Basic Shopify - 4
- Shopify - 5
- Advanced Shopify - 8
- Shopify Plus - 20 (Contact Plus Support if you need more than 20 locations.)
This is the first screen you will see when you are in your Location section.

TIP: Your business address will appear as your Shipping address. You can edit the address used for your business to calculate shipping rates in your Shipping Settings. If you have a PO Box number, this will not work with your Shipping settings, because you cannot ship from a PO Box number. It has to be a physical address.
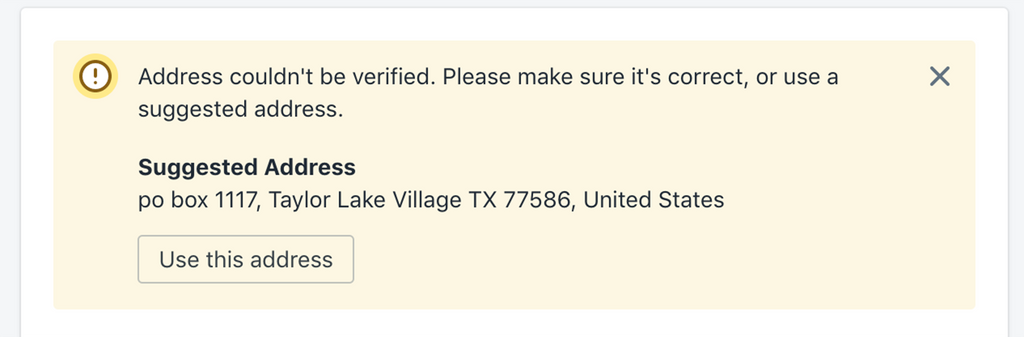
When you create a location, the system will try to verify your address.
If your address cannot be verified, you will get a warning, as in the image above. This means USPS/UPS/FedEx doesn’t recognize the shipping address.
Sometimes the shipping address is not accepted. This means USPS has not located your real address. You have to add the exact name of the street/road/drive etc. and zip code.
For instance: 1234 Drama st
should be: 1234 Drama Str or Street (try both)
And as I mentioned before, it cannot be a PO Box address. You cannot ship from a PO Box address. It has to be a physical address.
TIP: If you have specified a wrong location address in this section, deactivate the location first, save, and then you can delete the location.
2. Shipping & Delivery in Shopify Settings
**Where to find this in Shopify? Settings > Shipping
This section is all about basic Shipping zones and what options to use or not use.
You can choose which states in the USA you want to deliver to and which countries you want to ship internationally.
If you have never dealt with shipping internationally, I would suggest starting shipping in the USA only if you are a business located in the USA. The same will apply if you are an international company, try local first and get familiar with the shipping processes before attempting to expand your area.
Why do you ask?
When you start, selling & shipping your products there is a definite probability that you will have to adjust your shipping/weights/prices and those are all influenced by your first customers buying your products. This is a much easier task if you are confident shipping locally than shipping internationally, which has a lot of different hurdles to overcome.
Let’s explain all the different shipping rates first before you set up your shipping rates.
Different Types of Shipping Rates
There are several ways to ship your packages:
- Flat/Manual Shipping Rate
- Calculated Shipping Rate
- Mark Up or Discounted Shipping Rate
- Free Shipping Rate
Manual Shipping Rates
The first choice is a ‘Flat Rate Shipping’ or ‘Manual Shipping Rate’ calculated on the order price or product/item weight.
When to use manual shipping rates
Shipping methods that require manual rates include:
- Free shipping
- In-store pickup
- Various regular postage rates
- Deliveries managed by a fulfillment service.
There are two types of manual shipping rates:
- Weight-based rates – set your shipping rates based on the total weight of the orders you receive.
- Price-based rates – set your shipping rates based on the price of the orders you receive.

Weight-Based Shipping
Weight-based rates are usually more accurate than price-based rates because they reflect the actual costs of shipping a customer's order.
Weight-based rates are calculated by adding:
- the combined weight of the products in the order
- the weight of the packaging that you're using.
Price-Based Shipping
Basing your shipping on prices can be quite inaccurate.
Shopify says:
“All price-based shipping rates are calculated based on discounted totals. If a customer uses a discount code, shipping for the order is calculated based on the discounted order total.”
Calculated Shipping Rate
‘Calculated Shipping’ is determined by third-party shipping service eg. USPS, UPS or DHL Express for domestic shipping within the USA and USPS, USP, FedEx, Canada Post, and DHL for international shipping.
You choose which shipping service you want to use and obviously which will benefit your customers with the best and cheapest shipping rate.
TIP: Research different shipping services and sizes of packages for your products. Try and use the smallest package possible which will save you (if you offer free shipping) and your customer’s money.
Shopify says:
“Calculated shipping rates are determined at checkout by a third-party shipping service based on the details of the order. This helps you charge your customers the exact amount that a shipping carrier, such as UPS or FedEx, will charge you when you purchase a shipping label.”
Mark Up or Discounted Shipping Rate
If you use calculated shipping rates, the rates could work out higher or lower than when you are shipping your products and you might want to either mark the rates up or discount the rates.
For example - if you have large or bulky lightweight items, the calculated shipping rates would not reflect your true shipping rate.
Shopify says:
“You can adjust calculated shipping rates to mark up or discount the rates that your customers see at checkout. For example, if the rate is too high to attract customers, then you could discount it by a certain percentage to increase sales. Instead, if for example, the rate is too low to cover your packaging and handling costs, then you can increase it.
You can mark up calculated shipping rates by an additional flat fee or by a percentage of the total shipping rate. If you adjust a calculated shipping rate to include both an additional flat fee and a percentage markup, then the percentage is calculated before the flat fee is added. For example, a $5.00 rate with 50% markup and a $1.00 flat fee costs the customer $8.50, not $9.00.
If you want to offer discounted shipping, then enter a negative value. For example, -5% or $-2.50.”
Free Shipping Rate
You can create free shipping on all of your products, some of your products or free shipping over a certain value.
Shopify says:
“Although free shipping is great for your customers, it can heavily decrease your profit margins.”
Price-Based Free Shipping
Example:
Buy $150 and get free shipping. Your minimum price would be $150 and no maximum price.
Weight-Based Free Shipping
Example:
Free shipping over or under a certain weight.
Set your minimum weight and maximum weight. Don’t forget your Box/Letter/Package weight including the weight of your inserts for your package.
For example, if you wanted to offer free shipping on orders only above $50, then you would set the Minimum order price to be $50. Alternatively, if you wanted to offer free shipping for orders that contained four or more products, you can make each product weight 1 lb and then create a free shipping rate with the Minimum order weight set to 4 lbs.
Free Shipping on All Products
If you have free shipping on ALL your products. No minimum and no maximum weights or prices. This you can set up under Price-Based Shipping.
Local Free Shipping
If you only want to do local free shipping, you need to make it clear naming your zone. Not that it is going to stop buyers who are not local to use that option. For some reason, buyers never read the information.
There is one restriction with this shipping option. When selecting your state for free delivery, you are choosing your total state/province. If you only truly want to ship free to for instance Houston Texas, your customers in Texas can choose this option in the checkout.
Shopify does not offer to ship to specific zip codes. You will have to add a shipping App to be that detailed.
Shopify says:
“To create a local delivery shipping rate, you first have to remove the province or state from the shipping zone, and then create a new shipping zone that includes only the province or state. After you create the new shipping zone, add all the previous shipping rates and the new local delivery rate.
You can create multiple local delivery rates within a province or state by specifying the region of the delivery in the title of the shipping rate. For example, Local delivery - Houston or Free Toronto delivery for postal codes starting with M4, M5, M6, and M8. Any customer within the province or state can still select this option, so if a customer outside your intended region chooses the method, you'll need to contact the customer.”
In-Store Pickup
Eligibility
Shopify says:
“In-store pickup for online orders will be available for brick-and-mortar merchants. You won't gain access to this feature if one of the following conditions applies to you:
You are a casual user of Shopify POS (for example, selling at pop-ups or events), and are not a brick-and-mortar merchant.
If you're not using multiple locations, then you can't use the in-store pickup for online orders.
You have more than 20 locations.
You are a Plus merchant with a customized checkout.”
This section is covered in my book “Optimize your Shopify store" which will be published in September 2021.
Rates At Checkout
Choose where you ship and how much you charge for shipping at checkout. To charge different rates for certain products, create a shipping profile.
General Shipping
- If you ship all your products from the same location, Shopify has created a ‘General’ profile for you with all the basic Shipping rates included.
- If you have different locations your products are shipped from, then you will create different shipping profiles for the products shipping from each location.

Set Up Your Shipping
Step 1.
Add your shipping zones.
Select ‘Manage Rates’ and a new window will open.

Step 2.
Set Up Shipping Rates in Shopify.
In the first section, you will see ‘Products’ and ‘0’. You do not have to add your products to this section if you are only shipping from 1 location.

Shipping from
- First is the location you will be shipping your products from. You can also change the shipping location.
- Second, in this section, you create your Domestic shipping zone and International shipping zone (if applicable). You can name these zones anything you want to, the customer does not see the names. I would name them according to the zone that you chose to set up.
Shopify has automatically created a series of flat or manual shipping rates.

Setting Up Your Domestic and International Shipping Zones
If you do not want to use the flat rates, you just delete the zone as shown, to be able to set up your new Domestic zone.
Step 4.
Domestic Zone
In this example, we will set up the ‘Domestic zone’ in the USA. If you are in a different country, you will set up your ‘Domestic zone’ for your country.

Here are some ideas for easier Shipping in the USA.
Shipping to the domestic USA
You can make a choice where you want to ship to. There are 62 states/territories in the USA that you can ship to. These include our normal 50 States in the USA, the USA territories listed below, and of course, Washington DC (which is not classed as a state).
American Samoa
Federated States of Micronesia
Guam
Marshall Islands
Northern Mariana Islands
Palau
Puerto Rico
U.S. Virgin Islands
Armed Forces Americas, Europe, Pacific
These territories are not classed as international, but rather domestic shipping. But you do have to treat these zones as international because you need to fill out import/export forms to ship to the territories. This might be more trouble than it is worth. You make the decision.
Suggestion: I would start local/domestic states before I start considering the USA territories. Get comfortable shipping your products and then decide if you need to venture out more. It really depends on where your customers are.
TIP: Make sure you know what the cost of your product is and also what it cost to ship it. In case you want to add FREE shipping to your store, you need to add that cost to your product cost. Don’t forget to think about your variable costs and your fixed costs!
Step 5.
You have 2 choices for your rates.
- Set Up Your Own Rate (Manual Shipping Rates) - Weight-based and price-based shipping
- Calculated Shipping Rates - Real-time shipping
Step 6.
Manual Shipping Rates

Step 7.
Set your ‘Conditions’ for your flat or manual shipping rate.

Step 8. Calculated Shipping
Calculated shipping in Shopify is extremely easy to setup. You can decide which shipping provider to use,

TIP: Research the different types of shipping for each shipping service. Do not choose all of the types of shipping deliveries, because giving your customers too many choices will be confusing.
Step 9.
Choose to automatically update new shipping services as they become available. The rates for the different shipping services will increase randomly. You might miss the notice which could cost you money because you are not charging your customer enough shipping fees.
Step 10.
Handling Fee
In this section, you can increase or decrease your shipping rates or add a handling fee.
Step 11.
Calculated Shipping Rates
The second choice is the ‘Calculated Shipping Rate’.
Step 12.
Choose to automatically update new shipping services as they become available. The rates for the different shipping services will increase randomly. You might miss the notice which could cost you money because you are not charging your customer enough shipping fees.
Step 13.
Now you can choose your different types of shipping.

If you creating your Shopify store in a country outside the USA, you will only have custom pricing by weight or price available.

Step 14.
Handling Fee
In this section, you can increase or decrease your shipping rates or add a handling fee.
Step 15.
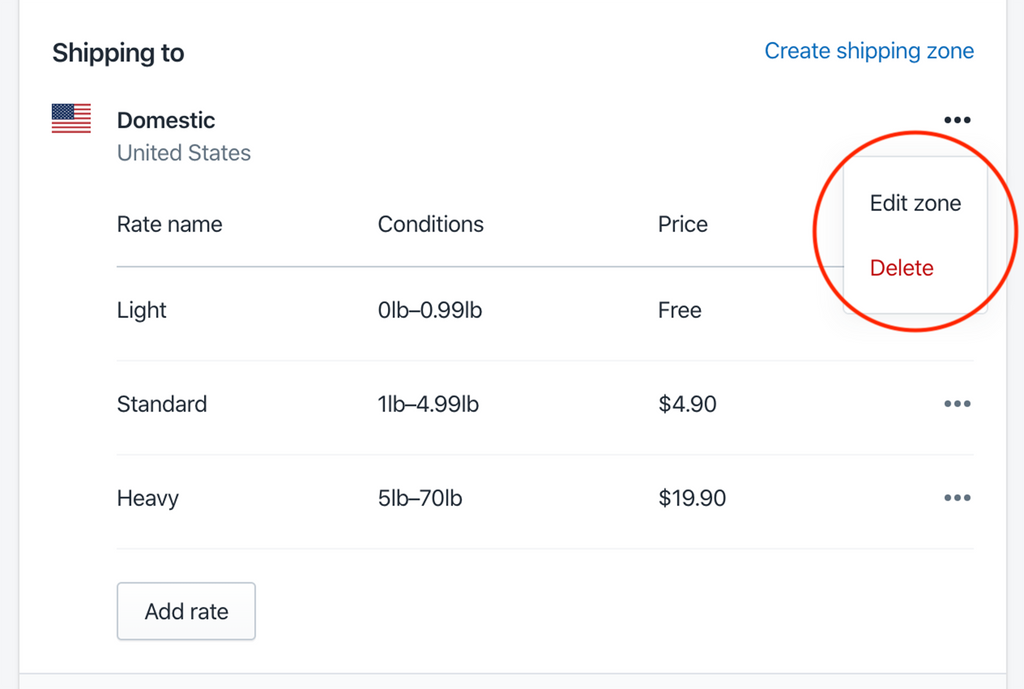
Changing or Editing Shipping Rates or Zones
You can edit the shipping zone or the shipping rate as seen below.

Step 16.
Save your information.
Set up free shipping:
Name your FREE SHIPPING - the name will be visible to your customers.
Step 17.
FREE Shipping Rate
- If you have no calculated shipping added, you can create your new zone for your free shipping rate.
- If you already have one zone for Domestic calculated shipping created, you will create a new profile for FREE SHIPPING.
1. Free Shipping
If you have no calculated shipping added, you can create your new zone for your free shipping rate.
Go to the ‘Manage rate’.

Step 18.
Name your shipping profile - make it distinctive so you will recognize it. Your customer do not see your shipping zone names.

Step 19.
Create a new shipping zone.

Step 20.
Add your zone name. And add your country/state zones to the profile.

Step 21.
Now that your zone is created, add your rate.

Step 22.
Set up your free shipping rate as manual shipping rates (your own rate).
Rate Name will be ‘FREE SHIPPING’. This is what the customer will see in checkout. Your price is $0 (free).
Add ‘Conditions’ and your price will be based on the order price. Set your minimum price to the value you determine and the maximum price at $0. (no limit to what customer can buy)

Step 23.
2. Custom Shipping Profile for Free Shipping
If you already have one zone for Domestic calculated shipping created, you will add a new rate for FREE shipping.

Repeat Steps 18 - 22.
If you are creating your free shipping for the same country/state as your calculated shipping zone, you have to delete the calculated shipping zone first before you can add the free shipping zone. 
As you can see above, you cannot select any of the states in the USA you have already selected for a calculated shipping zone. Now you can only select the country or state you have not selected.
Free Shipping on All Products
If you have free shipping on ALL your products. No minimum and no maximum weights or prices.
Local Free Shipping
If you only want to do local free shipping, you need to make it clear in the naming of your zone.
Repeat Steps 18 - 22.
You need to delete the state in your calculated shipping rates to activate this step.
Step 24.
International Zone
If you do not want to ship internationally, your customer will be informed there is no shipping internationally or no shipping to their specific country.
TIP: I would start with local shipping/domestic shipping and get familiar with your shipping process before broadening your horizons.
Next, you decide which countries you want to ship to. Check the appropriate country and you have the same choices as Domestic USA shipping.
TIP: If you ship internationally, I would suggest adding a note to your shipping information about the VAT and Taxes and Duties. (This can be found under the setting - Legal pages).

You have 2 choices for your rates.
- Set Up Your Own Rate (Manual Shipping Rates) - Weight-based and price-based shipping
- Calculated Shipping Rates - Real-time shipping
Step 25.
International Manual Shipping Rates
[This is the same as for normal manual shipping rates but I included it here so that you do not have to search for the information]
The first choice is a ‘Flat Rate Shipping’ or ‘Manual Shipping Rate’ calculated on the order price or product/item weight.

Step 26.
Set your ‘Conditions’ for your flat or manual shipping rate.

Step 27.
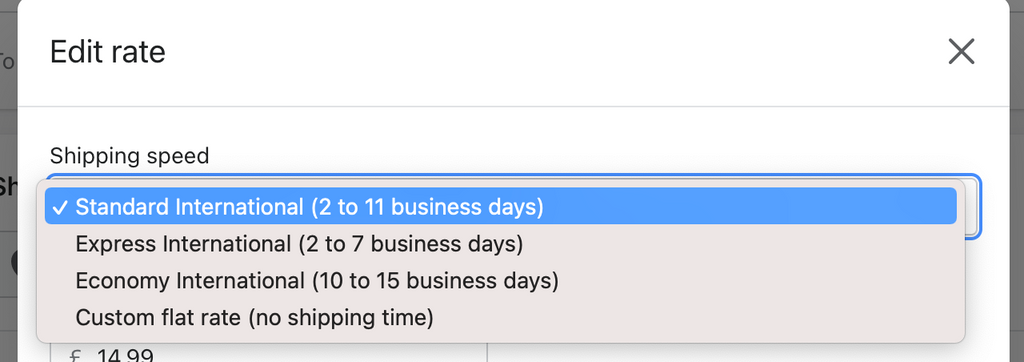
You have a choice of DHL Express, USPS, or UPS.
Adding different shipping carriers and services is pretty easy. For each shipping carrier, you will have to choose another ‘Add Rate’.

Step 28.
Choose to automatically update new shipping services as they become available. The rates for the different shipping services will increase randomly. You might miss the notice which could cost you money because you are not charging your customer enough shipping fees.
Step 29.

Add ‘Worldwide Services’. This is to activate the worldwide rates within the shipping services.
Step 30.
Choose to automatically update new shipping services as they become available. The rates for the different shipping services will increase randomly. You might miss the notice which could cost you money because you are not charging your customer enough shipping fees.
Step 31.
Now you can choose your different types of shipping.

Step 32.
Handling Fee
In this section, you can increase or decrease your shipping rates or add a handling fee.
Step 33.
Changing/Editing Shipping Rates or Zones
You can edit the shipping zone or the shipping rate as seen below.

Step 34.
Once you hit ‘SAVE’, you get the next step.
Step 35.
If you choose UPS Worldwide, you have to register your UPS account. This happens automatically as soon as you fill out the information.
Registering with UPS

Custom Shipping Rates For Products
If you are shipping from different locations, you need to create a profile for each location. The shipping rates will be different for each location.
First example:
If you have different shipping rates for different products. For instance, you can create flat rate shipping for some products, and calculated shipping for other products.
Second example:
One set of products will only be shipped in the USA.
Another set of products can be shipped to the USA and Canada.
And maybe, a few can be shipped to the USA and Internationally.
So you have 3 different profiles!
Step 36.
Add a name for your profile and make your profile name very logical - for instance, ‘Domestic & Canada’. In this sample, domestic shipping will be the USA and the only international zone is Canada.

Add your products to this profile.
Step 37.
On the same page, create a Shipping Zone (at the bottom of the page) for the USA (your domestic shipping zone) and you will get a pop-up. Once you have added your choice, click Done.

Step 38.
Still, on the same page, create another Shipping Zone for Canada (your international shipping zone) on the same profile. Click Done.

Step 39.
Now SAVE your entries.
If you have more profiles, rinse, and repeat.
Shipping from Different Locations
Local Delivery
Step 40.
Manage Delivery by Location
Choose the address you want to use for local delivery.

Then you can choose the deliver zone by zip codes or by distance radius of delivery area.

Now you can get delivery rates – priced or free. And you view of your ‘checkout preview’.

Step 41.
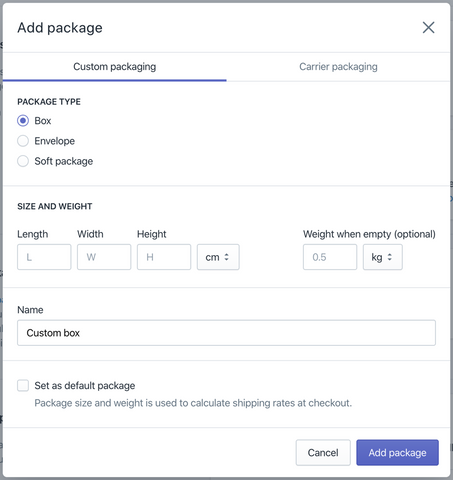
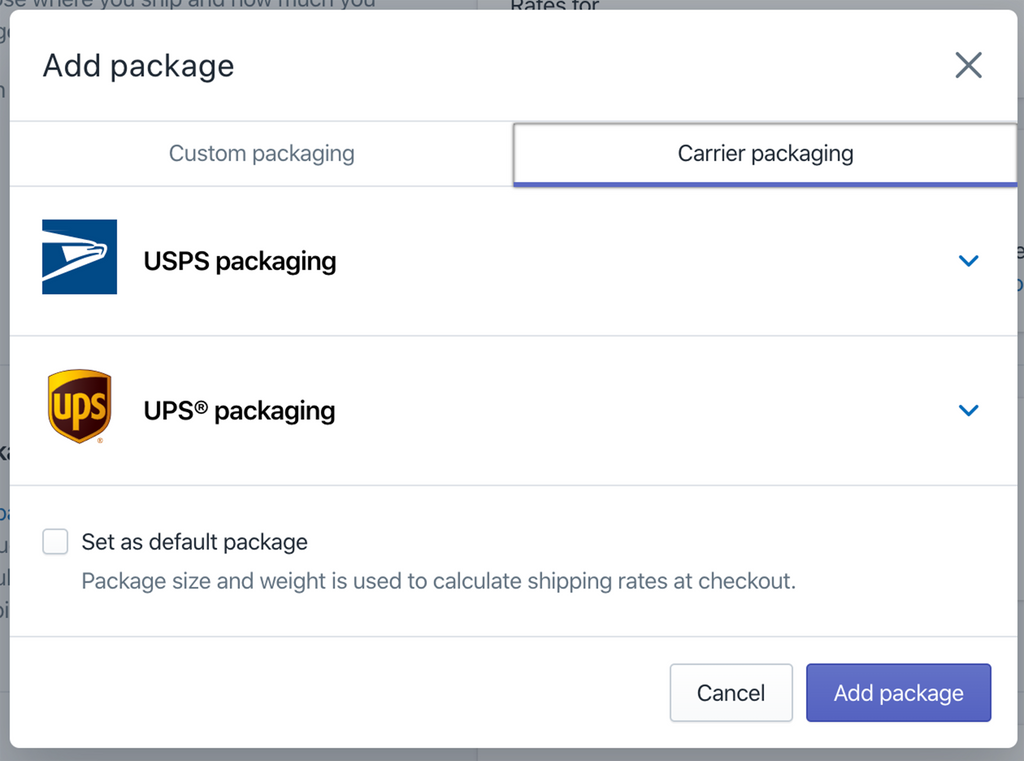
Packages
Shipping Packages
Your package weight and dimensions will be added to the weight of your products to calculate the correct shipping rate.

You have a choice - ‘Custom packaging’ or ‘Carrier packaging’.
Custom Packaging
If you have your own packaging or you get your packaging from a vendor other than a shipping service.
Carrier Packaging
Packing from a Shopify approved shipping service, only UPS or USPS right now.
Step 42.
Custom Packaging
Add the dimensions of your package (L x W x H), the units of measurement, and don’t forget the weight of the box. The weight of the package will be automatically included in your product weight to give you an accurate weight for your shipping cost.
Don’t forget to add the weight of your internal packaging, cards, invoice, etc.
Set your most used package as your default.
Step 43.
Carrier Packaging
You can get free packaging from any of the shipping services/carriers. You will probably have to create an account with each of the carriers.
Choose your package size.

Set your most used package as your default.
Step 44.
Shipping Labels
Shopify has discounted rates for shipping labels.
Shopify says:
“Shipping labels are attached to a shipment's packaging They show information that's used by shipping carriers to ensure a shipment is delivered correctly. Most labels contain the following pieces of information:
Recipient's name, address, and phone number - This lets the carrier know where to deliver the shipment, and provides a way to contact the recipient if necessary.
The sender's address - This lets the carrier know where to return the shipment if it can't be delivered to the recipient's address.
A barcode - This helps the carrier track the shipment's progress. For example, the barcodes are scanned whenever they enter or leave a carrier's facility.
Shipping labels can also show the following extra information:
The shipment's order number
A tracking number
The date when the order was shipped
The type of shipping service that was purchased
The shipping carrier's information
Before you give a shipment to a shipping carrier, you must purchase a shipping label and attach it to your shipment's packaging.”
Shopify offers discounted shipping labels from carriers with the shipping prices included. Or you can print your own shipping label with our own shipping carriers.
Shopify says:
“You can buy shipping labels in your Shopify admin or the Shopify app to speed up your packaging and fulfillment process, save time at the post office, display calculated rates to your customers, and get reduced shipping rates from USPS, DHL Express, UPS, or Canada Post. After you've bought a shipping label, you can print it, affix it to the outside of your package, and then ship the package from any post office.”
How does it work?
When you receive an order, you choose and print your label in the ‘Orders’ section.
You can check out the different shipping rates for each different package and compare prices.

Step 45.
Test print your shipping labels to make sure you like the look and it prints correctly.
Do you need to buy shipping labels?
Shopify says:
“Depending on how your business is set up, either you or your supplier purchases shipping labels. Generally, whoever is giving the shipment to the shipping carrier is the one who purchases the shipping label. If your supplier purchases the label for the shipment, then they usually charge you for the cost.”
Step 46.
Packing Slips

Edit Packing Slip Template
You may not want to use this feature unless you want to add a personal note, or maybe additional information to your packaging slip.
Adding a personal message or extra information is probably a good idea to stand out from your competition.

Accounts & Integrations
Connect and manage external shipping carriers and fulfillment services.
Carrier Accounts and Fulfillment Services


Carrier accounts
If you have your own shipping carrier account and negotiated shipping rates, then you would add the shipping services here.
You need the carrier-calculated shipping feature on your Shopify plan.
This is only available on the Shopify Advanced and Shopify Plus plans.

Here are the different shipping carriers in the USA.
Register your accounts with the shipping carrier you need and create an account for each carrier.


Custom Order Fulfillment
You can only add ONE fulfillment center/zone in this section.
Shopify says:
“When you mark an item or complete order as fulfilled in your Shopify admin, the fulfillment service is sent an email with all the order information so that they can fulfill it for you.”
If you have different vendors, you will have to use an App.
RESOURCES:
Shipping App for International shipping and local freight transport in the USA:
InXpress ‑ DHL at Checkout
DHL Carrier Rating for US and Canada based merchants Only.
I use InXpress for my LTL in the USA and international shipping. Contact seth.kornfeld@inxpress.com for more information.
Naming your own rates:
Manual Shipping rates
https://help.shopify.com/en/manual/shipping/rates-and-methods/manual-rates
Third-Party Carriers
Shipping Strategies
Okay, here is the bottom line about shipping…
If you are just starting out, stick to the basics, and make your shipping as simple as possible.
I have given you enough information to set up your basic shipping and provide you with some tips and links for you to check out on Shopify Help. They have excellent detailed information.
What is next?
In the next article, we will be covering
How To Set Up & Optimize Your Automated Email Notifications in Shopify #6
There are several articles dedicated to all of the Shopify ‘Settings’ section to set up your online business.
1. How Important Is Your Business Information In Shopify #3
Business information for your Shopify store is the foundation of your online store to keep your protected.
2. Setup Your Financials In Shopify.
Payment options, checkout and understanding of your money is important. Here are 4 articles dedicated to the 'Payment' options in your 'Settings' in Shopify.
- How To Set Up Your Financial Information In Shopify? #4
- How To Set Up PayPal Express & Amazon Pay In Your Shopify Store #4
- How To Get Paid From Your Payment Provider In Shopify? #4
- How To Set Up Your Checkout Your Shopify Store #4
3. How To Set Up Your Shipping & Distribution Locations In Your Shopify Store #5
Set up your locations and rates of your store so the process is seamless.
4. How To Set Up & Optimize Your Automated Email Notifications in Shopify #6
Personalize your email notifications with your brand and voice.
5. How To Set Up All Your Legal Requirements In Shopify #7
Your legal documentation for your eCommerce store to protect your business.
Get the complete book about how to set up your Shopify store:
SHOPIFY MADE EASY - Step-by-step Blueprint To Launch Your Online Store
FIND MORE HELPFUL ARTICLES - The helpful guide to starting your Shopify Store
Find my Shopify TOOLS PAGE for more information.
FOLLOW VERONICA:
You can join our Facebook group to engage and learn more about Shopify and how to get more customers to your Shopify store. This is a free group.
Ecommerce Success Group - Search for Ecommerce Success Group on Facebook.
