4. How To Set Up Your Checkout Your Shopify Store #4
**Where to find this in Shopify? Settings > CheckOut
Step 1. Customize The Style Of Your Checkout
Customizing the checkout in your Shopify store is easy.
You can upload a banner and your logo in your checkout that your customers will be able to view. It is a good idea to add your logo because you customer will know they are still in the same online store and which will create a trust factor with your customer.
TIP: Your logo you upload in the header of your store is not automatically added to your checkout page. We will be customizing the theme of your store in chapter 17.

Once you select ‘Customize checkout’, you are moved into the customization area of your theme.

Choose ‘Theme Settings’ to customize your checkout page in Shopify.
You can now add banners and your logo and backgrounds to your checkout page.

If you have a free theme, you will not be able to see the checkout page layout. In a paid Theme you will be able to see how and what you are creating for your checkout page.
Add your logo and banner with the right size image. Most themes will tell you what size your banner should be. In the checkout, I would suggest only creating a thin banner if you want to. I like to just add the logo for a nice clean look and not get the customer distracted.
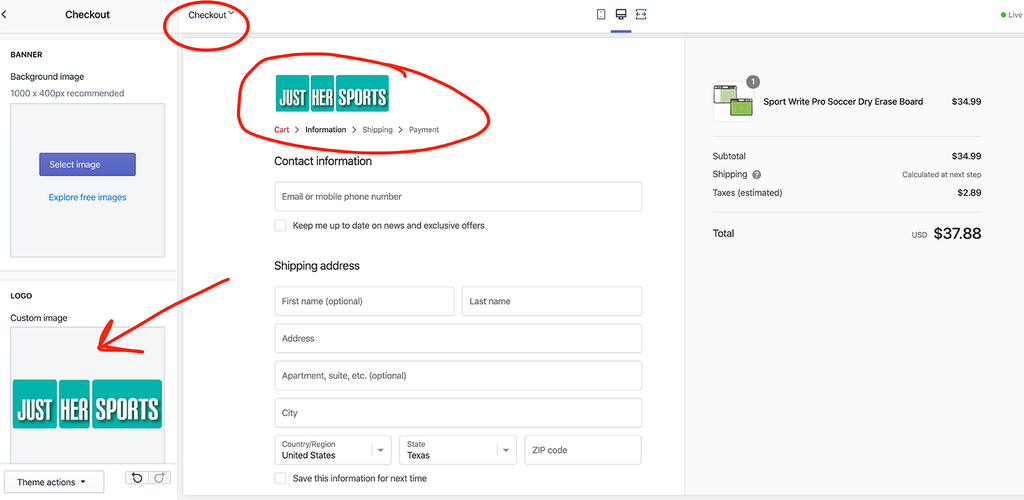
You can customize your checkout by navigating to the left side of the page under ‘Online Store’ - ‘Themes’ and ‘Customize’.
Step 2. Customer Accounts
Unless you want customers to create an account before they buy your products, don’t make this option a requirement. I normally leave this as optional. If some customers want to create an account, it is totally up to them. Your customer can view their orders in the account that is created for them.
The customer account gives your customer the option of contacting you for a refund or to return items.
I believe in giving your customers the choice.

Step 3. Customer Contact

Here are 2 options for customers to check out.
Your customer can choose to checkout via email or SMS
The customer’s email might not be collected via this method. Collecting your customer’s email is very important for you to contact them for reviews etc once they have bought products.
Customers can only checkout by using email
I would suggest choosing checkout by email and enable receiving shipping updates by SMS. If they choose SMS (a mobile text) you might not get their email address which also means you won’t be able to send them marketing emails. You have the best of both worlds!
To receive shipping updates
Here are 2 choices for you to add to your checkout. Customers can choose to add a phone number or email to receive shipping updates.
And/or they can choose to download the Arrive App to receive shipping updates.
This is only available in the United States, Canada, and Australia as of now. This might change in the future.
Step 4. Form Options
You can make several choices of how your checkout form (which is your checkout page) will look like.
Full name
A good reason to require first and last name is you can then personalize your subsequent emails.
Company name
If you do business with other businesses, schools, etc. (B2B) I would leave the company ‘optional’. If you are doing business directly with customers (B2C), you can keep the ‘Company name’ requirement hidden.
Address line 2 (apartment, unit, etc.)
Keep the ‘Address line 2’ optional for more shipping information if customers have apartments or extra address requirements
Shipping address phone number
Give your customers the option to choose the ‘Shipping address phone number’.

As I have reiterated before, giving your customers choices is a great idea.
Step 5. Tipping
This is a brand new option in Shopify. I would only use this option if your customer is used to tipping in your industry.
Step 6. Order Processing
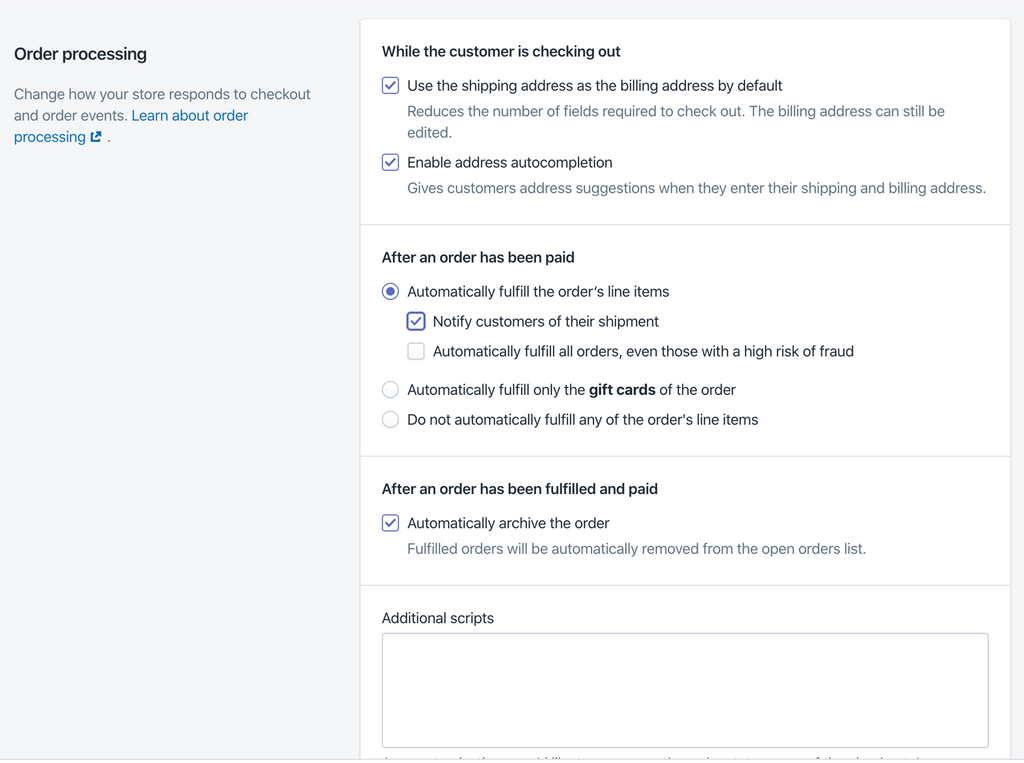
While the customer is checking out
Use the shipping address as the billing address by default
You want to make the checkout experience as fast as possible for your customers, Leave the Shopify default checked for ‘Use shipping address as billing address by default’.
Enable Auto-Completion
Shopify says:
“When your customers enter their shipping or billing addresses, they can be presented with address suggestions from Google Autocomplete. This feature lets your customers enter their address information faster and more accurately. These address suggestions come from Google, not from your customer's browser. If this feature is disabled or if your customers live in a country where this feature isn't supported yet, then your customers can check out as usual by entering their addresses manually.”
After an order has been paid
Automatic Fulfillment of Orders
Choose this option if you don't have any products available for pre-order, or you're selling digital downloads, or you’re using a fulfillment service (they should have a system in place).
I would also like to automatically inform customers of their orders unless you want more control, which I would suggest.
If you choose ‘Automically only fulfill the gift cards of the order, you cannot choose the above.
I would not automatically fulfill orders if they are a high-risk fraud, but it is your choice.
And obviously, you can choose not to automatically fulfill any orders.
Manually fulfilling orders
Shopify says:
“Manually fulfilling orders lets you easily keep track of your inventory and control when an order is sent. Manually fulfilling orders might be the best order fulfillment method if one of the following situations applies to your business:
* make products to order
* have products available for pre-order
* sometimes run out of stock
* want to be able to easily offer your customers partial fulfillment without having to issue a refund.”
Your automatic order email will be sent as soon as you fulfill the order.
After an order has been fulfilled and paid
I would automatically archive your order, it makes your life easier. One less thing to think about when you are fulfilling your orders.
Step 6. Email Marketing
Your customer can sign up for marketing which is an option you really want to take advantage of. Checking the pre-select option is against the GDPR rules.

“The GDPR is about giving your customers a choice to sign up but to opt-out of your marketing emails.”
GDPR (General Data Protection Regulation) affects your European customers. Even if you are only selling to the USA customers, there are Europeans living in the USA temporarily or visiting that could buy from you. If they order from you, and they are still under the GDPR protection.
Step 7. Abandoned Checkouts
You will lose about 68% of your customers to ‘abandoned checkouts’. This means while they are checking out, there are a number of reasons why they don’t complete the step. For example, they get interrupted, they are looking for their credit card and get sidetracked by the kids, they cannot decide, but there are varied reasons why.
Utilizing the automatic ‘abandoned checkout’ emails is a great way to remind your prospective buyer, that they can still make a decision to buy.
You can recover between 10% - 50% of sales by using ‘abandoned checkout’ emails.
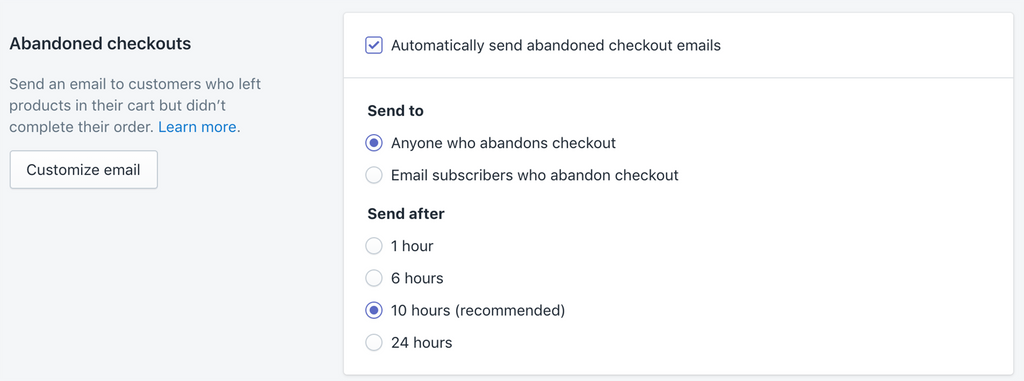
Testing out the time you send it our after your prospective buyer has left your store, is really a great idea. Shopify recommends 10 hours, but you might decide to send it sooner or later.
I will cover abandoned checkout notifications and email sequences in-depth in my next book ‘Optimize Your Shopify Store’.
Step 8. Checkout Language
This is a way to change the headers or language for your checkout. I would not change the language unless you have prior knowledge of some phrases that would work better.

We cover the store language changes in my next book ‘Optimize Your Shopify Store’.
RESOURCES:
Manual Payments - Testing payments in Shopify
Helcim - Payment merchant resources
Acquiring bank - resources for banks
https://www.finder.com/credit-card-networks-vs-issuers-difference
Read more about GDPR: https://eugdpr.org
What is next?
How To Set Up Your Shipping & Distribution Locations In Your Shopify Store #5
There are several articles dedicated to all of the Shopify ‘Settings’ section to set up your online business.
1. How Important Is Your Business Information In Shopify #3
Business information for your Shopify store is the foundation of your online store to keep your protected.
2. Setup Your Financials In Shopify.
Payment options, checkout and understanding of your money is important. Here are 4 articles dedicated to the 'Payment' options in your 'Settings' in Shopify.
- How To Set Up Your Financial Information In Shopify? #4
- How To Set Up PayPal Express & Amazon Pay In Your Shopify Store #4
- How To Get Paid From Your Payment Provider In Shopify? #4
- How To Set Up Your Checkout Your Shopify Store #4
3. How To Set Up Your Shipping & Distribution Locations In Your Shopify Store #5
Set up your locations and rates of your store so the process is seamless.
4. How To Set Up & Optimize Your Automated Email Notifications in Shopify #6
Personalize your email notifications with your brand and voice.
5. How To Set Up All Your Legal Requirements In Shopify #7
Your legal documentation for your eCommerce store to protect your business.
Get the complete book about how to set up your Shopify store:
SHOPIFY MADE EASY - Step-by-step Blueprint To Launch Your Online Store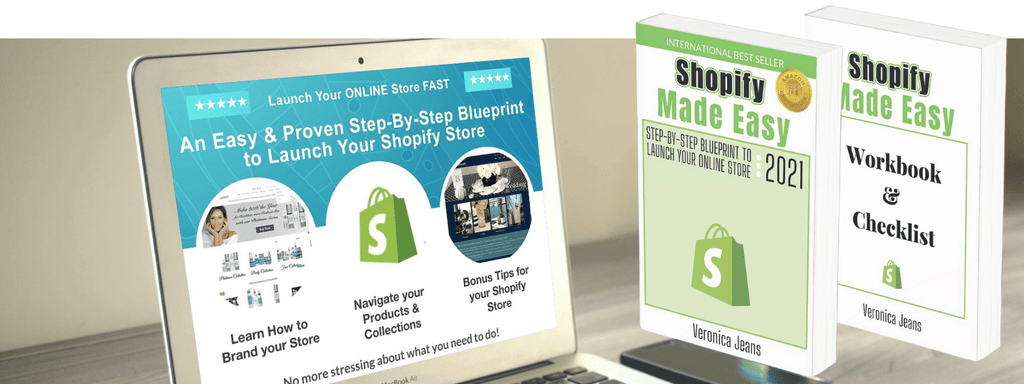
FIND MORE HELPFUL ARTICLES - The helpful guide to starting your Shopify Store
Find my Shopify TOOLS PAGE for more information.
FOLLOW VERONICA:
You can join our Facebook group to engage and learn more about Shopify and how to get more customers to your Shopify store. This is a free group.
Ecommerce Success Group - Search for Ecommerce Success Group on Facebook.

Veronica Jeans
eCommerce Strategist | Shopify Expert | 7-Figure Business Coach
I have integrated my extensive knowledge in the field of eCommerce and Shopify, along with my international financial expertise, to offer up a playbook for generating income online.

