2. How To Set Up PayPal Express & Amazon Pay In Your Shopify Store #4

How To Add PAYPAL EXPRESS In Shopify
A PayPal button in your store gives your customers more choices when shopping in your store. You want to make it as easy as possible for your customers to buy your products in whatever form they choose.
Shopify says:
“PayPal is one of Shopify’s default payment providers. As soon as you open a store, you're given a PayPal Express Checkout account with the email you used to sign up for your Shopify store. Before you can collect payments for orders made with PayPal, you need to set up your PayPal account.”
The only drawback with PayPal is that your money is not automatically transferred to your bank account. You have to manually activate your transfer in PayPal.
This is the easiest payment to set up.
What to expect in this article:
PAYMENTS SETTINGS
Step 1. Create an account.
If you don’t have a PayPal account, create one. If you do have one skip this step and go to the next step.
Step 2. Activate.
Hit ‘Activate’ and add the email address associated with your PayPal account.
You are connected.
Here is a resource on the Shopify support page. This will help if you have questions about activating PayPal.
https://help.shopify.com/en/manual/payments/paypal
Third-party Providers (Merchant Payment Provider)
If you are an international company/business, you will have to use a third-party provider.
Shopify says:
“Shopify supports two different types of credit card payment providers: direct providers and external providers. If you're using a direct provider, your customers can complete their purchases directly on your online store without having to pay at a third-party checkout. If you're using an external provider, your customers must complete their purchases on a checkout page that's hosted outside of your online store.
Providers that enable you to accept payment methods at a rate set by the third-party. A 0.5 - 2% fee applies to payments processed through third-party providers, depending on your Shopify plan.”
Why do you get charged more with third-party providers?
Shopify is providing a safe and secure platform to process your payments. And your third-party provider will also charge fees to process your transactions.
Shopify is not responsible for any fraud or fees if you use a third-party provider.
How To Add AMAZON PAY To Shopify
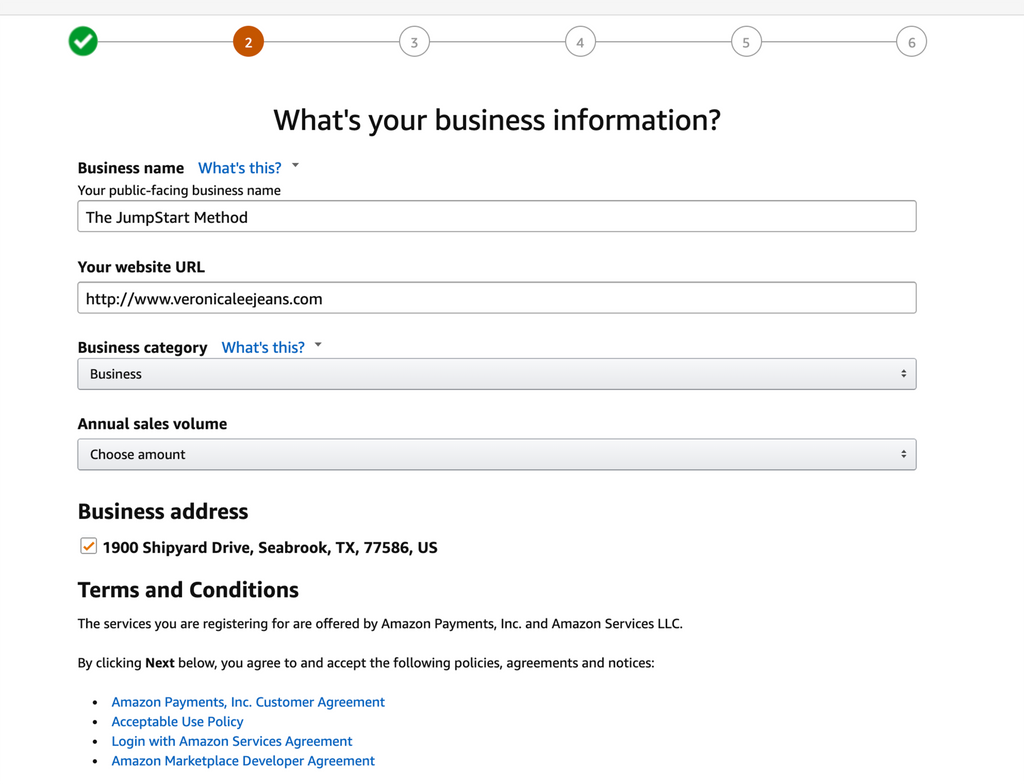
Amazon Pay creates a payment method for your customer to pay with their credit card on file in Amazon. It makes it more seamless for your customer to pay for your products.Amazon own your customer information but the payment and orders will be processed in Shopify.
When customers are processed through Amazon, you will not have their email address, only the shipping information. You have to contact the customer through Amazon.
Step 1.

Step 2.

Step 3.
If you have an Amazon account, you can add your personal account to your Amazon Seller account.
It’s your choice.
Step 4.

Step 5.

Step 6.

Step 7.

Step 8.

Step 9.
Connect to your Shopify store.


Step 10.
Now you are back in Shopify and you are connected.
Step 11.
All your Amazon credentials are in Shopify now.

Step 12.
This is what you will see in your email!

- THIRD PARTY PROVIDERS
This option is for international stores or prohibitive products e.g. Tobacco, CBD, etc. There is a list on Shopify website.
Providers that enable you to accept payment methods at a rate set by the third-party. A 2% fee applies to payments processed through third-party providers.
I will not show all the different third party payment providers, because it is a long list. It is also a great idea to investigate each one to see it they will suit your business.
TIP: If you don’t see an third party option for your business, I know a lot will create a connection to Shopify. This might incur a fee from your provider.
- ALTERNATIVE PAYMENTS
Shopify says:
“You can set up an alternative payment method to allow your customers to pay for their orders online using something other than a credit card. For example, a cryptocurrency is a popular option that allows your customers to pay without going through a bank or another institution.”
- MANUAL PAYMENTS
Shopify says:
“Some customers don't want to pay for their orders using a credit card. These customers can still place their orders online if you set up a manual payment method. When your customers use a manual payment method, you can arrange to receive their payment outside your online checkout. After you receive the payment, you can then manually approve the order. Common types of manual payments include cash on delivery (COD), money orders, and bank transfers. If your store and your customers are based in Canada, then you can accept email money transfers”
Here are the different ‘Manual Payments’ you can activate:
- Create a Custom Payment Method
- Cash On Delivery (COD)
- Bank Deposit
- Money Order
Create Custom Payment Method:

With the other different manual payment methods – cash on delivery, bank deposit, and money order, you will need to add additional details and payment instructions for your customers to pay you.
Additional details - displays to customers when they are choosing a payment method on the checkout.
Payment instructions - displays to customers after they placed an order.
PAYMENT CAPTURE
There are 2 ways to capture payment in this section. Automatic and manual payment.
Generally, you will use an automatic capture.
Shopify says:
“When a customer makes a payment using a credit card, the payment information needs to be captured and sent to their bank for processing. If you are using Shopify Payments or another credit card payment provider, then you'll need to decide how to capture payment from your customers.”

- Automatically capture payment for orders
The customer’s payment is authorized and charged automatically.
Most online stores use this method.
- Manually capture payment for orders
You have to manually authorize the customer’s payment.
Why would you capture payments manually?
An example is if you are dropshipping your products, and you only want to charge the customer when your dropshipping has been approved.
The extra step would be to capture the payments within the authorization period.
Shopify says:
“You’ll need to manually capture payment within the authorized period.
If you set up manual capture, you will have to capture payments from the Orders page in your admin.”
Shopify Payments provides an authorization period of 7 days which means you have to authorize the payments within 7 days in your store so that the order can be fulfilled.
Authorization of Payments
All credit card payment providers have an authorization period to allow a charge to be made to a customer's credit card. The authorization process first checks that the credit card is valid, and then that the card has enough funds on it for the transaction.”
At this time, when you are processing the payment, the fraud and risk checks activate, and not before.
TIP: When you get a large order and it is typically not your normal transaction amount, be suspicious, and do some due diligence to check if it is fraudulent. A good practice is to email or call your customer and verify that the order/credit card is legitimate. Most customers will appreciate your diligence to protect their credit cards. The risk of not checking is that the order will be shipped, the credit card owner refutes the charge and you don’t have your products or your money!
This does not mean you only get your money from Stripe/Shopify Payments in 7 days. Your payouts from your orders happen on your payout schedule you set in your ‘Shopify Payments’ section.
What is next?
How To Get Paid From Your Payment Provider In Shopify? #4
There are several articles dedicated to all of the Shopify ‘Settings’ section to set up your online business.
1. How Important Is Your Business Information In Shopify #3
Business information for your Shopify store is the foundation of your online store to keep your protected.
2. Setup Your Financials In Shopify.
Payment options, checkout and understanding of your money is important. Here are 4 articles dedicated to the 'Payment' options in your 'Settings' in Shopify.
- How To Set Up Your Financial Information In Shopify? #4
- How To Set Up PayPal Express & Amazon Pay In Your Shopify Store #4
- How To Get Paid From Your Payment Provider In Shopify? #4
- How To Set Up Your Checkout Your Shopify Store #4
3. How To Set Up Your Shipping & Distribution Locations In Your Shopify Store #5
Set up your locations and rates of your store so the process is seamless.
4. How To Set Up & Optimize Your Automated Email Notifications in Shopify #6
Personalize your email notifications with your brand and voice.
5. How To Set Up All Your Legal Requirements In Shopify #7
Your legal documentation for your eCommerce store to protect your business.
Get the complete book about how to set up your Shopify store:
SHOPIFY MADE EASY - Step-by-step Blueprint To Launch Your Online Store
FIND MORE HELPFUL ARTICLES - The helpful guide to starting your Shopify Store
Find my Shopify TOOLS PAGE for more information.
FOLLOW VERONICA:
You can join our Facebook group to engage and learn more about Shopify and how to get more customers to your Shopify store. This is a free group.
Ecommerce Success Group - Search for Ecommerce Success Group on Facebook.

Veronica Jeans
eCommerce Strategist | Shopify Expert | 7-Figure Business Coach
I have integrated my extensive knowledge in the field of eCommerce and Shopify, along with my international financial expertise, to offer up a playbook for generating income online.

