You've been manually copying and pasting your author bio into every blog post, haven't you? Or worse, you've been living without one because it's too much work. Here's the truth: most stores either skip author bios entirely or install yet another app that costs $10+/month and has to be completely updated (breaks) when you switch themes.
There's a better way. Shopify's metaobjects let you create a reusable, schema-optimized author bio system that survives theme updates, costs nothing, and actually helps your SEO. This is the same method I use for my 7-figure clients because it works while you sleep.
What you'll accomplish in this guide:
- Create a metaobject definition for author information
- Build a custom section with proper schema markup
- Add your author bio to blog posts automatically
- Implement it without touching your theme's core files
Time investment: 30-45 minutes
Technical level: Beginner-friendly (I'll show you exactly what to click)
Cost: $0
Phase 1: Create Your Author Metaobject Definition
This is where we tell Shopify what information to store about you as an author. Think of it as creating a template that you'll fill in once and use everywhere.
Step 1. Access Metaobjects
- Log into your Shopify admin
- Go to Settings (bottom left corner)
- Click Custom Data
- Under "Metaobjects," click Add definition

Step 2. Configure Your Author Definition
- Name: Author
-
Type:
author(this creates automatically, all lowercase) - Click Add field and create these fields:
Field 1: Name
- Type: Single line text
- Name: name
- Make it required (check the box)
Field 2: Description
- Type: Multi-line text
- Name: description
- Make it required
- This is your actual bio content
Field 3: Title
- Type: Single line text
- Name: title
- Optional (for job title like "eCommerce Consultant")
Field 4: Image
- Type: File
- Name: image
- Optional
- This is your headshot
Field 5: Social Links
- Type: URL
- Name: social_links
- Make it a list (check "List of values")
- Optional
Field 6: Contact
- Type: URL
- Name: contact
- Optional (for contact page or email link)
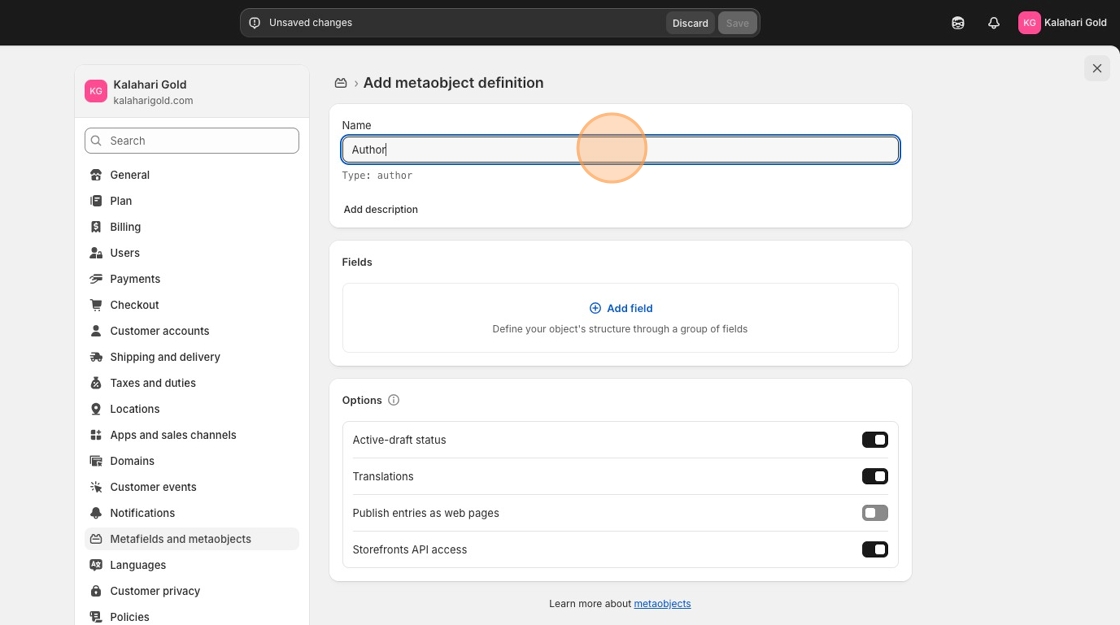

Step 3. Configure Access
- Under "Storefront access," enable Storefront and Web pixel
- This makes your author data available to your theme
- Click Save
View of created Fields:
| Field name | Type | Required | Notes |
|---|---|---|---|
name |
Single line text | Yes | Full name of the author or owner. |
description |
Multi-line text | Yes | Short summary or profile of the author (used as a description/bio). |
image |
File (image) | No | Profile photo or avatar of the author. |
title |
Single line text | No | Role or position, e.g. “Founder & CEO”. |
social_links |
List of links (one URL per line) | No | Social profiles such as LinkedIn, Instagram, X, etc. |
contact |
URL | No | Contact URL (e.g. contact page, mailto: link, or form URL). |
Phase 2: Create Your Author Entry
Now fill in your actual information in your Shopify dashboard > Contents > Metaobject > Author

Step 1. Add Your Author Profile
- In the same Custom Data screen, you'll see "Author" under Metaobjects
- Click Add entry

Fill in your information:
-
- Name: Your full name
- Description: Your complete bio (this is what appears on blog posts)
- Title: Your job title or credentials
- Image: Upload your professional headshot
- Social Links: Add your LinkedIn, Twitter/X, Instagram URLs (one per line)
- Contact: Your contact page URL or mailto: link

Step 2. Save Your Entry
- Click Save
- Note the entry name—you'll select this later
Phase 3: Create the Author Bio Section
This is where the magic happens. We're creating a custom section that pulls your author data and displays it beautifully with proper schema markup.
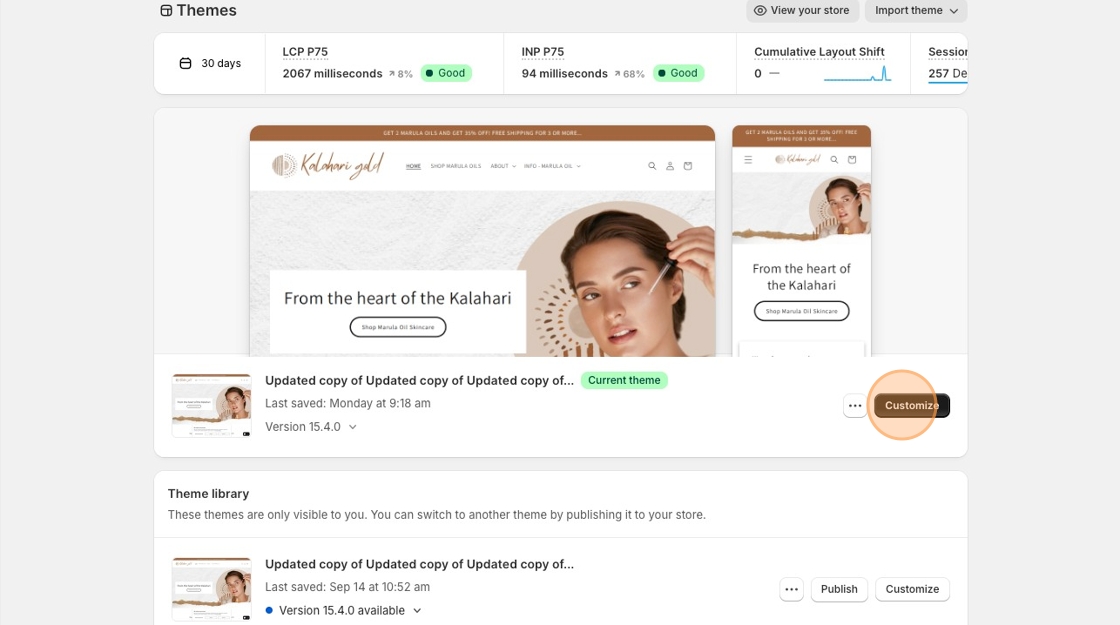
Step 1. Access Theme Code
- Go to Online Store → Themes
- Click the three dots (•••) next to your active theme
- Select Edit code

Step 2. Create New Section File
- In the left sidebar, find the Sections folder
- Click Add a new section
- Name it:
author-bio-schema(no spaces, no .liquid extension needed) - Click Done

Step 3. Paste the Complete Code
The file will not have any code in it. Copy and paste everything in that file with this code:
<div class="author-bio-section">
  {% if section.settings.author %}
    {% assign author = section.settings.author %}

    <div class="author-bio-card">

      {% if author.image.value %}
        <div class="author-photo-wrapper">
          <img src="{{ author.image.value | image_url: width: 300 }}" alt="{{ author.name.value | escape }}" class="author-photo">
        </div>
      {% endif %}

      <div class="author-bio-content">
        <h3 class="author-name">{{ author.name.value }}</h3>

        {% if author.title.value != blank %}
          <p class="author-title">{{ author.title.value }}</p>
        {% endif %}

        {% if author.description.value != blank %}
          <p class="author-description">{{ author.description.value }}</p>
        {% endif %}

        {% if author.social_links.value != blank %}
          <div class="author-social">
            {% assign links = author.social_links.value | split: "\n" %}
            {% for link in links %}
              <a href="{{ link }}" target="_blank" rel="noopener" class="author-social-link">
                {{ link }}
              </a>
            {% endfor %}
          </div>
        {% endif %}

        {% if author.contact.value != blank %}
          <p class="author-contact">
            <a href="{{ author.contact.value }}" target="_blank" rel="noopener" class="author-contact-link">Contact</a>
          </p>
        {% endif %}
      </div>

    </div>

    <!-- JSON-LD Schema -->
    <script type="application/ld+json">
    {
      "@context": "https://schema.org",
      "@type": "Person",
      "name": {{ author.name.value | json }},
      "description": {{ author.description.value | json }}
      {% if author.title.value != blank %},
        "jobTitle": {{ author.title.value | json }}
      {% endif %}
      {% if author.image.value != blank %},
        "image": {{ author.image.value | image_url: width: 600 | json }}
      {% endif %}
      {% if author.contact.value != blank %},
        "url": {{ author.contact.value | json }}
      {% endif %}
      {% if author.social_links.value != blank %},
        "sameAs": {{ author.social_links.value | split: "\n" | json }}
      {% endif %}
    }
    </script>
  {% endif %}
</div>

<style>
  .author-bio-section {
width: 800px;
    margin: 40px 0;
    padding: 30px;
    border-radius: 12px;
    background: #f7f7f7;
  }

  .author-bio-card {
    display: flex;
    gap: 30px;
    align-items: flex-start;
    flex-wrap: wrap;
  }

  .author-photo-wrapper {
    flex: 0 0 150px;
  }

  .author-photo {
    width: 150px;
    height: 150px;
    object-fit: cover;
    border-radius: 50%;
    border: 3px solid #ddd;
  }

  .author-bio-content {
    flex: 1;
    max-width: 600px;
  }

  .author-name {
    margin: 0 0 5px 0;
    font-size: 26px;
    font-weight: 700;
  }

  .author-title {
    margin: 5px 0 15px;
    font-size: 16px;
    color: #777;
  }

  .author-description {
    line-height: 1.6;
    margin-bottom: 20px;
  }

  .author-social {
    margin-bottom: 12px;
  }

  .author-social-link {
    display: inline-block;
    margin-right: 15px;
    color: #0066cc;
    font-size: 14px;
    text-decoration: none;
  }

  .author-social-link:hover {
    text-decoration: underline;
  }

  .author-contact-link {
    font-weight: 600;
    color: #333;
    text-decoration: none;
  }

  .author-contact-link:hover {
    color: #0066cc;
  }

  @media (max-width: 600px) {
    .author-bio-section {
      padding: 20px;
    }

    .author-bio-card {
      flex-direction: column;
      align-items: center;
      text-align: center;
    }

    .author-photo-wrapper {
      flex: 0 0 auto;
    }

    .author-bio-content {
      max-width: 100%;
    }
  }
</style>

{% schema %}
{
  "name": "Author Bio with Schema",
  "settings": [
    {
      "type": "metaobject",
      "id": "author",
      "label": "Select Author",
      "metaobject_type": "author"
    }
  ],
  "presets": [
    {
      "name": "Author Bio"
    }
  ]
}
{% endschema %}
Step 4. Save the File
- Click Save in the top right
Phase 4: Add Author Bio to Your Blog Post Template
Now we'll add your author bio to appear automatically on every blog post. Navigate to your Online Store > Edit theme (Customize).
Step 1. Find Your Blog Post Template
- In the dropdown menu at the top, select Blog posts template.
- Click to open it

Step 2. Add the Author Section
We want to add the author bio after the blog content but before the comments.

Finding Your Entry ID:
- Go back to Settings → Custom Data → Author
- Click your author entry
- Look at the URL—it ends with a number like
/12345678 - That number is your entry ID
- Replace
YOUR_ENTRY_IDwith that number
Step 3. Add to Order Array
Add "author-bio" to the order array where you want it to appear:
"order": [
  "main",
  "author-bio",
  "related-posts"
]
Step 4. Save Template
- Click Save
Phase 5: Test and Customize
Step 1. Preview Your Work
- Go to Online Store → Blog Posts
- Click any blog post
- Click View to see it live
- Your author bio should appear automatically
Step 2. Adjust Styling (Optional)
The section includes basic styling. To customize colors, spacing, or fonts:
- Return to your
author-bio-schema.liquidsection - Modify the CSS inside the
<style>tags - Common changes:
- Background color: Change
#f7f7f7 - Name font size: Change
26px - Photo size: Change
150px - Border radius for square photo: Change
50%to8px
- Background color: Change
Why This Method Beats Apps
Cost savings: Most author bio apps charge $5-10/month. This costs nothing.
Theme independence: Apps often break when you switch themes. This metaobject approach is theme-agnostic and survives updates.
SEO benefits: The schema markup tells Google exactly who wrote the content, potentially increasing your authority signals.
Control: You own the code. No third-party dependencies, no surprise feature changes.
Performance: One less app means faster page loads and better Core Web Vitals scores.
Frequently Asked Questions
Next Steps After Implementation
Once your author bio is live, leverage it:
- Update your existing blog posts: The author bio appears automatically on all posts using that template
- Test your schema markup: Use Google's Rich Results Test to verify your Person schema is valid
- Create author-focused content: Now that you have proper author attribution, lean into thought leadership content
- Monitor performance: Check Google Search Console to see if author-attributed posts perform differently
This isn't just about looking professional—it's about building authority signals that help your content rank and convert. Every blog post now reinforces who you are and why readers should trust you.
You've just implemented something most eCommerce stores either ignore or overpay for with apps. That's the difference between working harder and working smarter.
