How To Set Up Your Shopify Store Correctly For Great Conversions #8

When you have a store visitor landing on your website, ....
What to expect in this article:
What is a storyboard?
Why are we creating a storyboard?
How Storyboarding affects your store
Step for step storyboarding
Let’s create a storyboard
Create your collections
Naming your collections
Re-use your collections
How do you connect your products to your collections
What is a storyboard?
Wikipedia says:
“A storyboard is a graphic organizer that consists of illustrations or images displayed in sequence for the purpose of pre-visualizing a motion picture, animation, motion graphic or interactive media sequence. The storyboarding process, in the form it is known today, was developed at Walt Disney Productions during the early 1930s, after several years of similar processes being in use at Walt Disney and other animation studios.”
Why are we creating a storyboard for Shopify?
When you create a storyboard for your Shopify store, you are creating a customer experience that leads to sales.
In essence, you make it as easy as possible for your customers to navigate your store. This means happy customers spending lots of money!
Think of your customer experience as walking through a big-box department store. You have different departments and each department is separated into different sections, which is laid out with the customer in mind.
This is how I want you to think about your online store.
2 Reasons for great customer experience in your store
- The first reason for creating an awesome customer experience is you have a very short span of time to keep your prospective customer’s attention.
- Another reason to make your customer experience short is mobile shopping.
Mobile shoppers are on the rise! 79%, and rising every year, consumers are shopping from their mobile devices. So your store has to be really optimized for mobile shoppers.
How can you optimize their experience?
You create the shortest path to your objective, which is to get your customers to the right product fast.
The best practice is to get the customer from the first view to the product page as quickly as possible in only 3 clicks/actions if you want customers to buy without getting frustrated.
Here is an example of a typical shopping path:
They see an ad on Facebook and then land on a page in the online store. When they take action on this page it takes them to a collection page (1st Click/Action). From the collection page, they choose a product (2nd Click/Action). Then they will add the product to the cart (3rd Click/Action).
TIP: Just check out at Amazon - how many actions you need to take to get to the product? Test it out to see what happens.
The purpose of storyboarding is to get a clear picture of your store to enhance your customer's experience when they shop.
How Storyboarding affects the setup process for your store
It is an easy process to connect your products to the collections, navigation, and homepage in Shopify after creating your main departments and your different sections.
If you don’t do this first step of planning, it can be a very confusing and frustrating exercise to set up all the different aspects of your store. And you can imagine, your customers will be confused as well.
Step for step storyboarding
Departments and sections are a ‘collection’ in this exercise. It is a good idea to start thinking of your departments as ‘collections’ in your store as you are laying out your storyboard.
Step 1.
Let’s create your storyboard.
We are going to either start with a spreadsheet, document or just a piece of paper. I like to use paper first. Get some sticky notes in different colors and a large piece of paper and start brainstorming.
Step 2.
Create your collections
Decide what main and other collections your store will have.
A collection is a bundle of products of the same type.
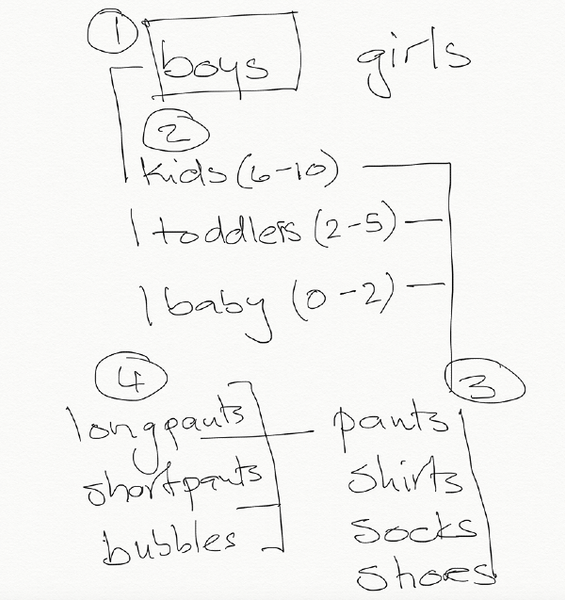
I will use a kids’ boutique as an example:
- Your main types are Boys and Girls.
- In the Boys collection, there are different types of boys - kids, toddlers, babies.
- In each of the Kids, Toddlers, Babies collections, you have different types of clothing - pants, shirts, socks, shoes.
- Breaking it down more, in the Pants section, you have short pants, long pants, Jon Jons, etc.
See how each collection has different levels of types of products.
Here a quick sketch:

And here it looks a lot clearer transcribed into a spreadsheet.

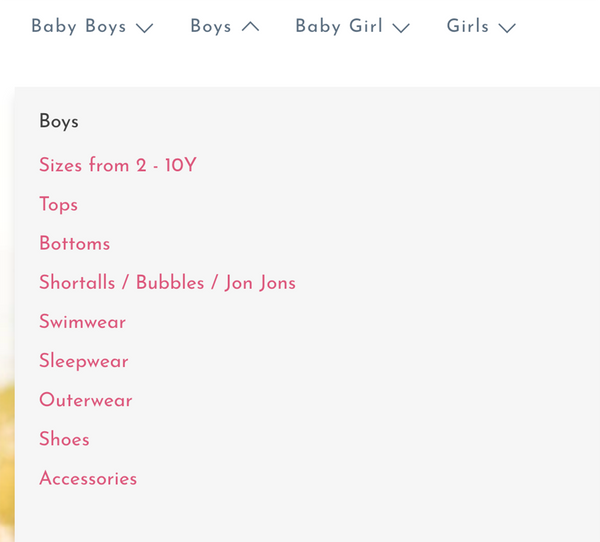
Here is an example of a Shopify store - just the main collections:

Here you can see the sections within the collection:

This is a great process to make sure your products end up in the right collections.
If you do not have a lot of different products, here is an example of how to organize your main collection i.e. one collection as ‘Catalog’. We have only 8 products in this store at the moment. We created a ‘Catalog’ collection to show the products.

Even if you only have a few products, you might be planning to add more to your store. This is a great exercise to think of what you are going to add and when you are planning to add more options.
Step 3.
Naming your collections
Think of descriptive keyword/s for each collection. Each of these sections will be part of your navigation in your store.
For instance:
(Menu/Navigation at top of page) ‘Flex Duct’

(Collection page) ‘Industrial Flex Duct’
The collection page must be descriptive for the customer. It must make sense for each collection.

TIP: Search online stores that you like, and it must be a fairly large or brand store for ideas and examples. A smaller online store will not have the traffic and customers and knowledge of what is successful or not.
Do not repeat the same name for another collection.
Each collection will represent a page in your Shopify store. Every page in your store must have a unique name.
Here are some quick reasons why:
- It will be confusing for you when you are creating your navigation in your store later.
- It is going to be confusing to your customers.
- Google does not like pages with the same name. If your customer searches you want to make sure they will get the right page.
Step 4.
Re-use your collections
Once you have created a collection, you can re-use the collection in several different navigational areas.
For instance:
Sports is the main collection.
Field Hockey and Lacrosse are sub-collections.
Within that sub-collection, for instance, you have all the Lacrosse equipment.

Now you can also see that you can add a sub-collection i.e. Lacrosse Sticks to another main collection.

How do you connect your products to your collections in your store?
The easiest way to connect your products and collections is with a ‘tag’.
The great thing about a spreadsheet is, you can now add your ‘tags’ for each page. Tags make a search easier, products will be automatically added to your collections, and your search optimization is awesome.
What is next?
In the next article, we will discuss tags and how you use tags in your Shopify store.

Veronica Jeans
eCommerce Strategist | Shopify Expert | 7-Figure Business Coach
I have integrated my extensive knowledge in the field of eCommerce and Shopify, along with my international financial expertise, to offer up a playbook for generating income online.

