Stop fumbling with Shopify's backend. Here's the straightforward process to add metaobject entries so you can organize your store like a 7-figure brand—without the guesswork.
What Are Metaobjects (And Why You Should Care)
Look, I get it. "Metaobjects" sounds like tech jargon that only developers understand. But here's the truth: metaobjects are one of Shopify's most powerful features for organizing your store's content—and most store owners aren't using them.
Think of metaobjects as custom filing cabinets for your store. Instead of cramming everything into products and collections, you can create custom content structures for designers, brands, lessons, lookbooks, recipes—whatever your business needs. This is how professional brands organize their content, and it's exactly what separates amateur stores from ones that convert.
Why this matters to your bottom line: Better organization means faster site management, improved customer experience, and the ability to scale without your backend becoming a chaotic mess. You're building a 7-figure business, not a hobby shop.
Step-by-Step: Adding a New Metaobject Entry
This is the straightforward process—no fluff, just what you need to know.
Step 1: Navigate to Your Metaobjects
In your Shopify dashboard, click "Content" in the left sidebar. Then click "Metaobjects". You'll see all the metaobject definitions you've created.
Don't see any? You'll need to create a metaobject definition first. Think of this as creating the template before you add individual entries.

Step 2: Select Your Metaobject Type
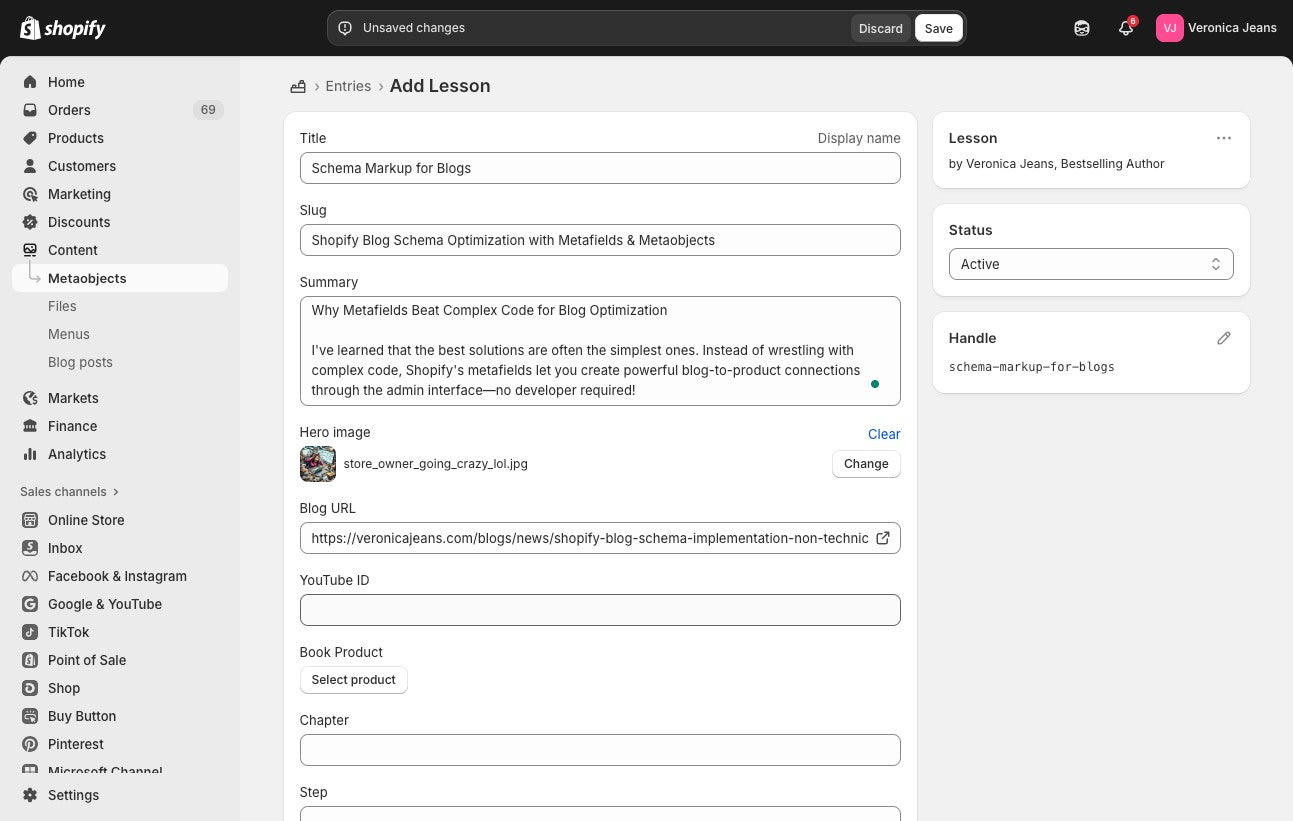
Click on the specific metaobject you want to add an entry to. Common examples include "Designers," "Brands," "Lessons," or "Lookbooks"—whatever structure you've set up for your store.

In the following image you can see how I laid out the lesson metaobject fields.

Step 3: Add a New Entry
Click the "Add entry" button. This opens a blank form based on your metaobject definition.

Step 4: Fill in Your Core Information
Here's what you'll typically need to complete (using a "Designer" metaobject as an example):
- Title: The name of your designer, brand, or entry
- Slug: This is your URL handle—keep it clean and SEO-friendly (lowercase, hyphens instead of spaces)
- Description: Your main content. Make it compelling and keyword-rich.
- Media: Upload your logo, featured image, or relevant visuals
- Collection Link: Connect to the related Shopify collection if applicable
- URL: Add external links if needed (like a designer's official website or a button destination)
The following two images show all the entries for the "Designers" example.

Step 5: Configure Additional Metafields
This is where the magic happens. Depending on your setup, you might have:
- Collections: Link to specific product collections
- Categories: Organize entries by type or group
- Featured (Boolean): Toggle this to highlight specific entries on your storefront
- Related Pages: Connect to size charts, care instructions, or custom pages
- Blog Posts: Reference related content for better internal linking
- Products: Select specific products to feature within this entry

Step 6: Add Media and External Links
Click "Select file" to upload images or choose from your existing media library.

For video content:
- Add your YouTube ID (the code after "v=" in the YouTube URL)
- Include other social or external links as needed
Pro tip: Always optimize images before uploading. Large files slow down your site, and speed kills conversions.
Click "Select product" and choose your products to add to this section.

Step 7: Set Visibility
If you have added the "Published" boolean field (that's a fancy way of saying "on/off switch"). Set it to:
- True: Entry is live and visible on your storefront
- False: Entry is hidden (great for drafts or seasonal content you're not ready to show)
Pro tip: This is a great idea for Lessons/Workshops, etc.

Step 8: Save Your Work
Click "Save". Your new metaobject entry is now ready to use in your theme, pages, or wherever you've set up your metaobject references.

Pro Tips That'll Save You Hours
Here's what I've learned coaching dozens of store owners through this process:
Name Your Slugs Strategically
Your slug becomes part of your URL. Use keywords your customers actually search for. "luxury-evening-dresses" beats "designer-collection-1" every time.
Batch Your Entry Creation
Set aside dedicated time to create multiple entries at once. Getting into a rhythm with the interface is faster than doing one entry here and there. This is about working smarter, not harder.
Use the Featured Boolean Intelligently
Don't feature everything—that defeats the purpose. Feature your top sellers, seasonal highlights, or strategic promotions. Scarcity creates value.
Test Visibility Before Publishing
Always preview your entries on your live site before setting them to "Published: True." Catching errors before customers do is the difference between professional and amateur.
Keep Descriptions SEO-Rich but Natural
Your descriptions should read like you're talking to a friend—but include the search terms your customers use. Google rewards helpful content, not keyword stuffing.
3 Common Mistakes (And How to Avoid Them)
Mistake #1: Creating Entries Without a Clear Structure
The fix: Plan your metaobject definitions before you start adding entries. What fields do you actually need? What information helps customers make buying decisions? Build the system once, use it forever.
Mistake #2: Forgetting to Link Related Content
The fix: Use those collection links, product references, and page connections. The whole point of metaobjects is creating relationships between your content. Isolated entries are wasted opportunities for cross-selling and better site navigation.
Mistake #3: Neglecting Mobile Preview
The fix: Over 70% of eCommerce traffic is mobile. Check how your metaobject entries display on phones and tablets. What looks great on desktop might be broken on mobile—and that's where you're losing sales.
Frequently Asked Questions
What's the difference between a metaobject and a metafield?
Think of metafields as extra information you add to existing things (like products or collections). Metaobjects are entirely new content structures you create from scratch. Metafields enhance what you have; metaobjects organize what you need.
How many metaobject entries can I create?
Shopify doesn't have a hard limit on entries, but performance can slow down if you're managing thousands. For most stores, you'll be fine with hundreds of entries. If you're hitting thousands, you're probably ready for a more advanced database solution anyway.
Can I edit a metaobject entry after publishing?
Absolutely. That's one of the beauties of this system—you can update entries anytime without breaking anything. Just navigate back to Content → Metaobjects, select your entry, make changes, and save.
Do metaobjects affect my site speed?
Not if you use them correctly. The issue is usually large, unoptimized images—not the metaobject structure itself. Compress images before uploading, and you'll be fine.
Can I bulk import metaobject entries?
Yes, but you'll need to use Shopify's API or apps specifically designed for bulk importing. For most stores with under 100 entries, manual creation is actually faster when you factor in setup time.
What happens if I delete a metaobject entry that's being used on my site?
The references will break—meaning wherever that entry was displayed on your site will show nothing or throw an error. Always check where an entry is being used before deleting it. Better yet, set it to "Published: False" first as a safety net.
Do I need to know code to use metaobjects?
No. The Shopify interface for creating and managing metaobject entries is entirely visual. However, displaying them on your storefront might require theme customization or app integration, depending on your theme's built-in support.
Can I use metaobjects for things other than designers or products?
Absolutely—that's the point. I've seen stores use metaobjects for recipes, workout plans, styling guides, technical specifications, warranty information, ambassador profiles, and more. If you need to organize custom content, metaobjects can handle it.
Will metaobjects improve my SEO?
Indirectly, yes. Better-organized content means better user experience, which Google rewards. Plus, using proper slugs, descriptions, and internal linking through metaobjects helps search engines understand your site structure. It's not a magic bullet, but it's definitely a piece of the puzzle.
Your Next Steps
You now know exactly how to add metaobject entries in Shopify. But here's what separates store owners who stay stuck from those who scale:
Implementation beats information.
Don't just read this and move on. Schedule 30 minutes this week to:
- Audit your current content organization—where are you leaving money on the table?
- Create or update one metaobject definition that solves a real problem in your store
- Add your first entry using this guide
This is the kind of backend work that doesn't feel urgent—until you realize you've been working 60-hour weeks because your store isn't set up to scale. Professional systems create professional results. Amateur organization keeps you trapped in day-to-day chaos.
Your store should build wealth, not steal your life. Metaobjects are one small piece of that puzzle—but small systems compound into big freedom.
Now go implement. Your 7-figure business isn't going to organize itself.
